Trending
Opinion: How will Project 2025 impact game developers?
The Heritage Foundation's manifesto for the possible next administration could do great harm to many, including large portions of the game development community.

Featured Blog | This community-written post highlights the best of what the game industry has to offer. Read more like it on the Game Developer Blogs or learn how to Submit Your Own Blog Post
I will be turning a European stone statue into a Middle-Eastern rock statue by extracting the textures from 3D scans, manipulating their properties, while creating a game ready asset.

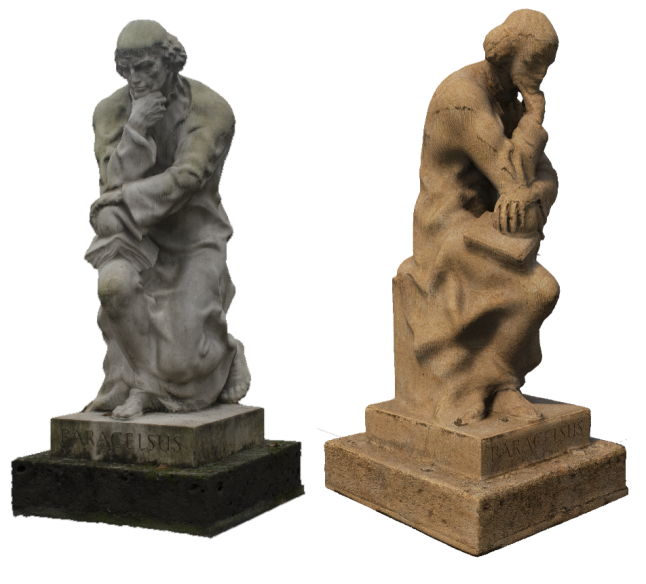 In this article, I will be doing an alchemy trick where I will be turning a European stone statue into a Middle-Eastern rock statue, and to do this I will be using the techniques that I have explained in my previous article.
3D scans have more information to work with, which enables us to extract richer textures that we can use to create materials with manipulatable properties, meaning that we can change the look of an object while preserving its feel.
This article will cover the steps of creating a game ready 3D model using a 3D scan to use in a game engine, and while I will be going over some details very swiftly, if you want to get decent results, don’t try to replicate these steps quickly, especially if it’s your first time doing this, give each step the time it needs and understand it very well, even if it takes days, then work on becoming faster at it.
These blog posts are meant to be independent of each other, and therefore if you read some of my previous posts, please excuse the repetition.
Capturing the Soul of a European Statue
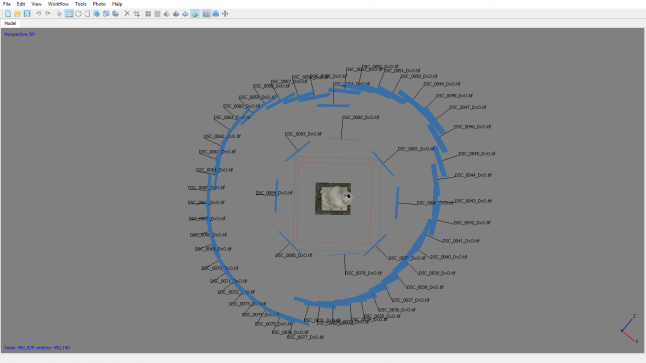
I was attending a 3D scanning conference in Salzburg (Austria), and I took it as an opportunity to do some sight-seeing and scan a few monuments. Here’s a Paracelsus statue that I scanned in the park. I didn’t take a lot of pictures (55 photos in total). I just took a loop around the statue, then took a few close-up pictures to get a higher resolution texture.
Then, I post-processed those photos using DxOptics (or Photoshop Camera Raw) and created two sets:
The first set was needed for reconstructing the model, meaning that its purpose is to provide photos with clearly visible features that will help the scanning software to align the images. To do so the photos had their histogram equalized, their contrast slightly increased, and they were sharpened a little using an Unsharp mask. Then they were saved in an 8-bit resolution.
The second set was needed for generating the texture, meaning that its purpose is to provide clean textures with a few shadows as possible, and a high dynamic range. The shadows and highlights were reduced, and the set was saved in 16-bit since this the texture will be heavily post-processed since we will need that extra information.
Later, I aligned the photos in Agisoft, and here’s the result:
 The model was not perfect and needed some tweaking, therfor I exported it to Autodesk Remake to make some minor tweakings.
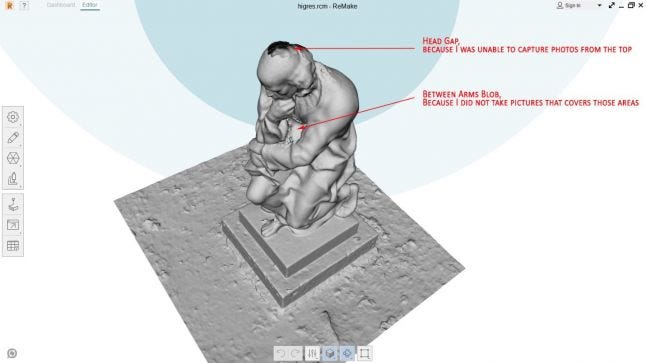 Remake can handle large meshes better than other software, and it’s great for manual polygon selection and deletion, and closing holes, not to mention that the interface is simple and intuitive to use. The mesh was then imported into ZBrush to re-sculpt those missing details, and later imported back into Agisoft.
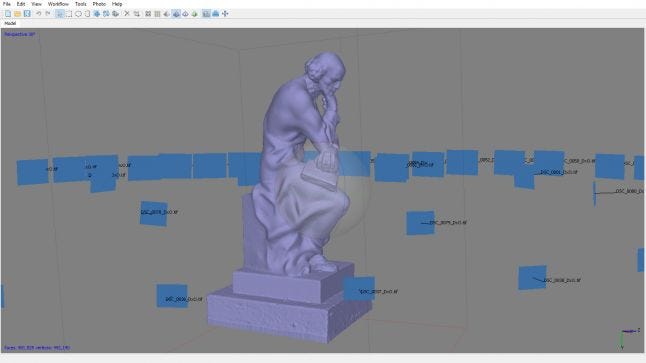
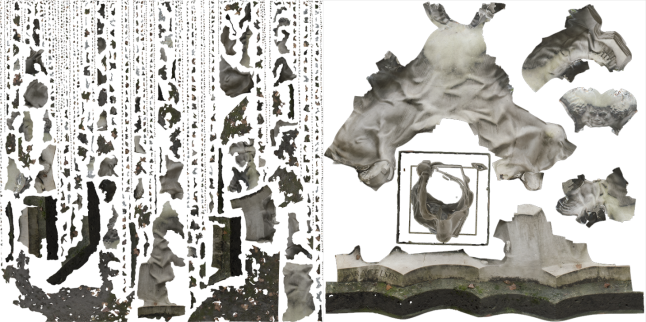
Even though the Agisoft automatically-generated UVs are not the best, there is no need to create UVs for the high-poly mesh since you’re not going to use it in your game, plus good luck creating proper UVs for a mesh with such a high poly count. Instead generate an overkill high-res texture (i.e. 16k), and then later project it on to your properly UVed low-res model, and generate your intended texture resolution (i.e. 8k). This will eliminate any white lines generated from seams.
The lower resolution mesh can be created using Meshlab, TopoGun, ZRemesher in Zbrush, ProOptimiser modifier in 3ds max, InstantMeshes, or whatever workflow you prefer. Then you properly UV the low-res mesh while trying to have as few seams and stretching as possible since we will be applying another texture on top later. Remember to properly orient the UVs as well, so that the overlaying texture doesn’t look randomly rotated in some areas on your object.
If you absolutely need to properly UV your High-Res model, you can always just go into ZBrush, use ZRemesher and create a lower-res mesh, UV that, then subdivided it and then re-project the details on top of it from the original mesh, creating a properly UVed high-res mesh.
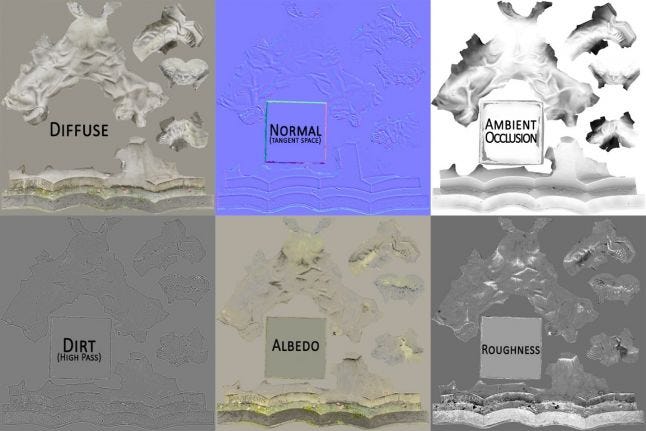
 With your High-Res Mesh, your Low-Res Mesh, and your Base Texture you can use XNormal (or whatever Texture Bake solution you prefer), to generate a Diffuse Map, a Normal Map, and an Ambient Occlusion Map. You can then apply the High-Pass Filter in Photoshop to your Diffuse texture to generate a Dirt Map. To generate the Albedo Map, I just used a quick Nondestructive Image flattening and reflection removal method demonstrated by James Busby from Ten24. This technique consists of selecting darker areas in a picture and then bumping their exposure a little. Note that this method is subjective, and I will be using later in this article a more accurate one. The Roughness Map was created by creating an inverted grayscale image of the diffuse map that I later leveled and subjectively tweaked a little.
 And here’s the result on Sketchfab.
Extracting the Essence of Middle-Eastern Rock
The process here is pretty similar to the statue’s, though our main purpose here is to extract a universal texture that will work on any model unlike the one created for our statue. I will be explaining more why we are doing this as I go a little deeper into some topics.
When removing features from a texture, it’s hard to know when to stop, and a way to answer this would be to keep in mind that everything we remove must be added later, whether by blending textures, or the game engine itself can calculate this information for you.
It’s always a good idea to define the target resolution for a scan, and this is what determines whether to take 6 photos to scan a wall, or 200 photos to scan a single rock.
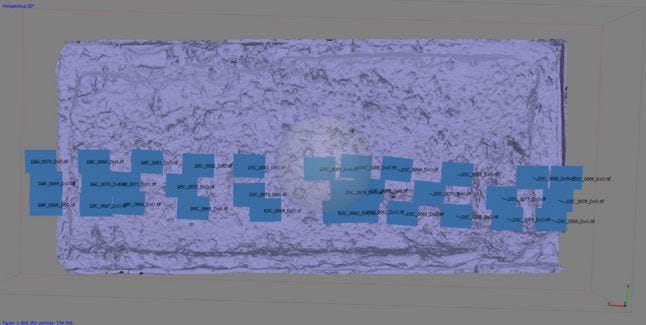
First, we scan our rock, since we would like to extract a high-res texture, we need to take a few more pictures to gain more resolution. And again, we create two sets of images, one for the reconstruction step, and the other texture projection step. Depending on how well calibrated and sharp your camera is you can skip this step and use your original images directly. Here is the scan generated from 37 Images:
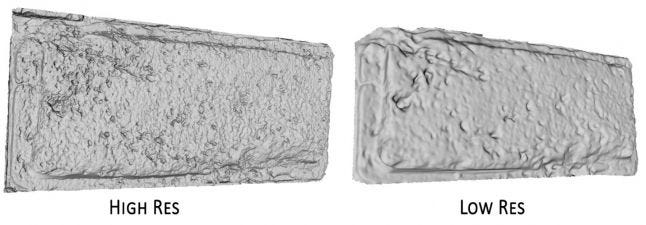
 One of the important properties of a certain surface is its bumps. In this case, we categorize the bumps of our mesh into 2 groups, the bumps that belongs to our material (i.e. small holes, roughness bumps), and the bumps that belong to our object and that define its shape (i.e. object’s edges, arm). We want to keep the material bumps while removing the object bumps. To do so we create a lower resolution mesh from the original scan that has only the object bumps. By subtracting the lower resolution mesh from the higher resolution mesh, we end up with the material bumps. Just think of the low-res model as a “Mask” for your bumps.
 If we just take a high res mesh and relax its UVs, we end up with a pretty flat result. However, if we create a lower-res mesh, relax its UVs, then project the details from high-res mesh, we can maintain those small details. In this case, we have a cubed shaped rock, we therefor create a cube of the same dimensions, and flatten its UVs which will leaves us with planar rocky surface.
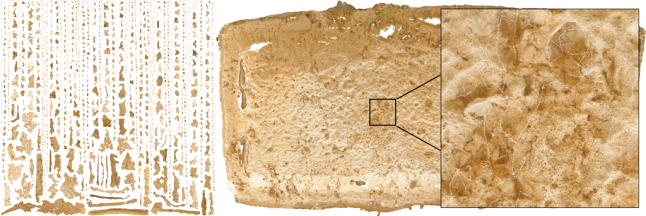
Again, we use generate a very high resolution texture on our high-res model using the automatically generated UVs from Agisoft, then we bake them on to our properly UVed low-res model. By looking at the following images, notice how when projecting from the automatically generated UVs on the right to the manually created UVs on the left, we get some white line all over our texture. This is only visible when you zoom in, the higher resolution your texture is, the less noticeable they are. Once you generate the texture you can downscale it to whatever resolution you need, and those lines should disappear.
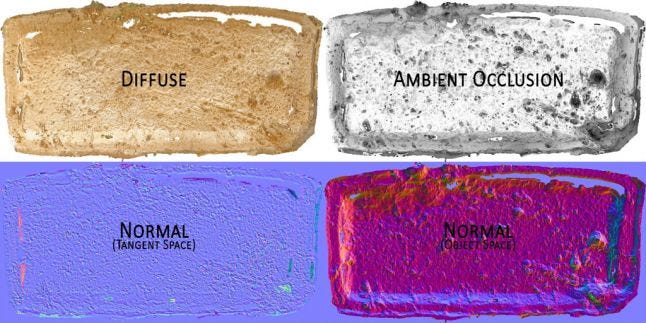
 Again, using XNormal you can generate a Diffuse Map, Normal Map (Tangent Space), Normal Map Object Space, and an Ambient Occlusion Map.
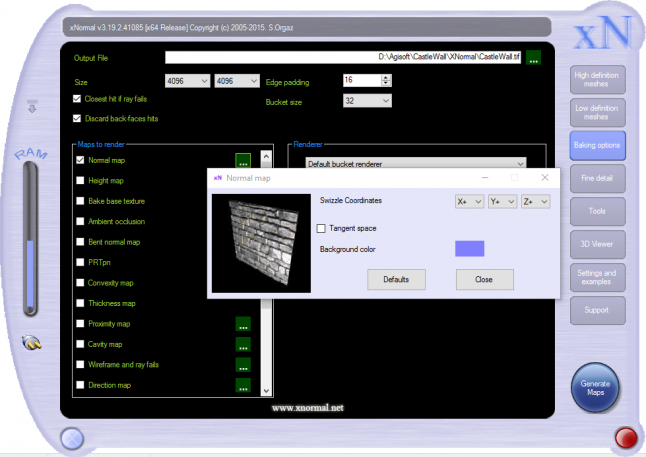
 XNormal is a free utility with a pretty straight forward interface, just select your High-Res Mesh and your Based Texture, then Select the Low-Res Mesh, then select your output directory, resolution, and the maps you want to bake, hit that big Generate Maps Button, and you’re done. To bake an object space normal map just uncheck the tangent space checkbox in the Normal Map settings.
De-Lighting the Texture
By now this process is a little outdated as there are different and faster approaches to de-light a texture (Substance, Megascan, etc…), nonetheless it’s still a valid approach, and it’s good to understand it.
The previously used de-lighting method for the statue is subjective, selecting darker areas and increasing their brightness is not the best approach since it’s hard to differentiate between dark edges, dirt and shadows, and if I used that technique on this rock I can end up with some pretty bad results like the following:
 And here’s where we can use our Object Space Normal Map. Think of it this way, this texture color codes the direction of each surface, meaning each pixel that has the same color are facing the same direction. Selecting those pixels with the same colors and increasing their brightness is equivalent to placing a light next to the object and illuminating that dark crevasse. This enables us to create a flat lighting environment in a smarter way. Note that this technique is valid for this rock, though if you are dealing with a bigger object with more complex shapes, sometimes different areas of the texture that have the same color needs to have their brightness adjusted individually, as they might be other light source in the environment of the captured scan that can affect the shadows. Later, you can use the stamp tool to fix the missing areas of our texture. Finally, always remember to us a 16-bit texture for this kind of processing and there are more color range to work with.
Here’s a demonstration of this technique:
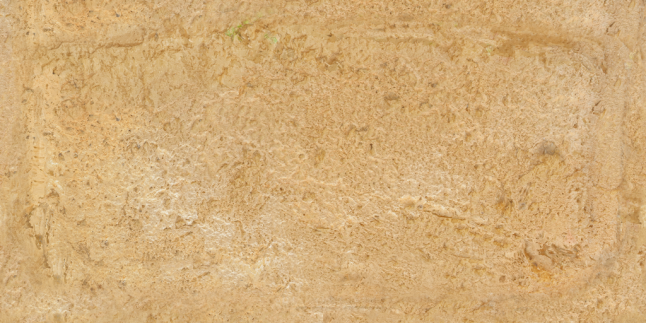
And here's the final result (Hey Ma! I just ironed a rock!):
 Putting it all together in UE4
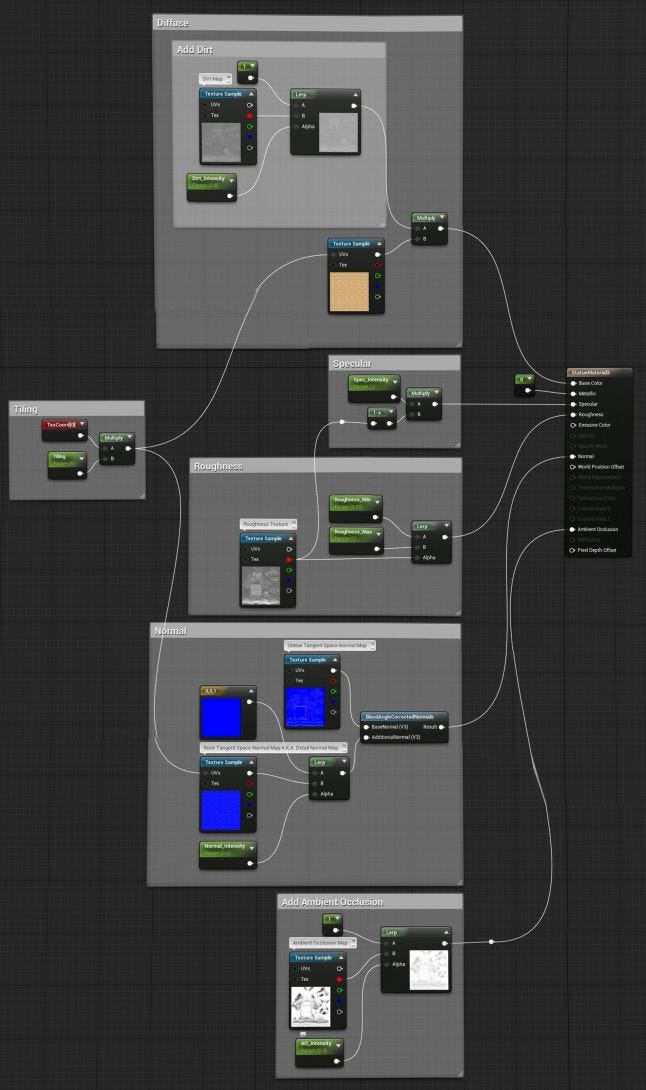
By now we have extracted all the information we need to perform our alchemy trick, and it’s all a game of mix and match. By separating the object properties from the material properties of the scans, we simply take the object properties of the first scan, and mix it with the material properties of the second scan.
Here’s the material setup in the Material Editor of Unreal Engine 4:
Conclusion
I hope you found these blog posts series useful, and if you have any questions you can always ask the comments down below, or hit me up on twitter @JosephRAzzam. For updates on the game progress, you can out the Devlog section of World Void.
Read more about:
Featured BlogsYou May Also Like