Trending
Opinion: How will Project 2025 impact game developers?
The Heritage Foundation's manifesto for the possible next administration could do great harm to many, including large portions of the game development community.

Featured Blog | This community-written post highlights the best of what the game industry has to offer. Read more like it on the Game Developer Blogs or learn how to Submit Your Own Blog Post
How to generate cool plant patterns in Unity3D with Substance Designer by Antegods' Lead Artist Tom Rutjens.

As we work hard to make our stonepunk arena action game Antegods a reality, you can stay up to date on our development process with regular blog posts from our design, art and code departments. This time, lead artist Tom will guide you through the creation of procedurally generated leaves in Substance Designer!
Substance Designer
In the previous art update I talked about Substance Designer and how amazing it is. Today I’ll give you some more insights into how this software helps us make randomly generated art.
We asked our Twitter followers whether they wanted to see a tutorial on our generated stone or leaf patterns. With a difference of only a couple of votes, a winner emerged: the leaf pattern! Yeahhh…
For our next #Antegods art blog post, what #substancedesigner tutorial would you like to see? #gamedev #indiegame https://t.co/ORZZ8Mg1iH
— Codeglue (@Codeglue)November 11, 2016
So how did we create those leaf patterns? It’s not easy, as you can see in the below graph. I’ll try to keep my explanations as simple as possible, though!
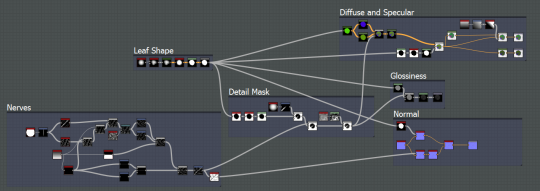
Step 1: Defining an ever-changing leaf shape
As mentioned in the previous Substance Designer blog post, the ‘random seed’ button is super useful. I decided to use it as the basis for our leaves.

Start off with a Shape node, with a scaled down Paraboloid pattern.
Use a Splatter Circular node to randomize the amount, scaling, positioning and luminance of the shape. Then, every time you change the random seed, all these settings will be randomized, creating a different shape.
Use a Gradient node to convert to a Color mode.
The Symmetry node mirrors the image on a diagonal axis. I picked diagonal because then the leaf’s root would always be in the bottom left corner.
Use a Levels node to bring the values closer to each other, resulting in a clear and crisp shape.
The Grey scale Conversion node changes the image back to grey scale.
Step 2: You’ve got some serious nerves
Now that we have a constantly changing shape, we need to create nerves that come from the leaf’s center. This step contains more sub-steps than the previous one, so it’s harder to follow. Stick with me!
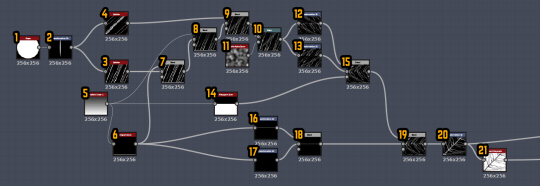
Start off with a Shape node again. Set it to Disc, full size.
Use a Transformation node to scale the disc into a needle.
The Splatter node randomizes the needle’s scale, positioning and rotation. These ones are more vertically orientated.
Use another Splatter node to do the same, except these are more diagonally orientated.
A little sidestep: create a Gradient map.
Use a Histogram Scan to up the contrast and positioning of the gradient. It only shows a horizontal line at the bottom, which will become the details of the main nerve.
A Blend node blends the first Splatter node (3) with the Horizontal Line (6).
Another Blend node blends the result with the Gradient, making it fade to black at the top.
Yet another Blend node adds the Splatter node (4) on top of it, using a low opacity so the diagonal lines aren’t as clear as the vertical ones.
A Warp node warps the nerve pattern with a mask.
For the mask we use a Perlin Noise Zoom node.
From the Warp node (10) we use a Transformation node to vertically mirror and scale the pattern 50% in height. Place it on the top half of the texture. Also move it a bit to the left or right.
Again, from the Warp node (10) we do the same thing. Use a Transformation node and cut the height in half. Place it on the lower half of the texture and move it a bit to the left or right. Do not vertically mirror the pattern!
The Blend node blends them together. We need a mask to block one half of the pattern to make the other one visible.
Use a Histogram Scan on the Gradient map (5) and up the contrast to the max. We now have a good mask for our Blend node. The result is pretty OK, except the main nerve is being destroyed by the Warp node we used earlier.
Luckily, we have the Histogram Scan node (6). From here we use a Transformation node to cut the height in half again, and place it on the top half of the texture.
Do this once more, but then vertically mirror it and place it on the lower half.
A Blend node blends these two together into one big line, placed in the exact middle.
We blend this with the result of the Blend node (15).
Our leaf shape is always diagonally oriented, so I use a Transformation node to rotate the nerve pattern 45 degrees and slightly scale it so it fits the texture.
For the upcoming Normal map I use Greyscale Invert Node to flip the pattern’s values.
Step 3: At long last, a Normal map
Now we have a leaf shape and a nerve system, we can create the final texture outputs of the material. Starting off with the Normal map.
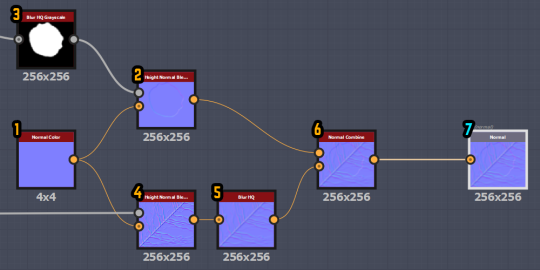
This is the final output. Our Normal map is done!
Start with a Normal Color node.
First, we want the edges of the leaf to feel rounded off. We use a Height to Normal Blend with a low intensity.
As an input for the Height to Normal Blend (3) we take the result of the leaf shape (Step1, Node 6) and connect it to a Blur HQ Greyscale to soften the edge.
The nerves also need to be shown in the Normal map, so we grab another Height To Normal Blend, and as an input we grab the result of the nerves (Step2, Node 21).
The outcome is way too crisp, therefore we use a Blur HQ node to soften the pattern.
We use a Normal Combine node to blend the leaf Normal map with the nerve Normal.
Step 4: Put on your Details Mask
Cool, this is going well! For the upcoming 3 textures, (Diffuse, Specular and Glossiness), we need to have a mask that has all the details combined. In the end, we’ll use this to get something more than just a flat-colored leaf.

First things first. I wanted the edge of the leaf to have a different color than the inside, so I took the result of the leaf shape (Step1, Node 6) and attached it to an Invert Greyscale node to invert the values.
The Glow Greyscale node makes the white bleed into the Black, creating a soft edge.
I pushed the values closer together to get a more defined edge.
A little sidestep: I wanted the root of the leaf to have the same color as the edge. Starting with a Shape node with a Paraboloid pattern.
Use the Transformation node to change the shape into a needle, rotate it 45 degrees and position it so that is always covers the bottom left corner.
Blend the result together with the Levels node (3).
Another Blend node adds the nerves (Step2, 20) to the mix.
Another tiny sidestep: the leaf could use some stains or spots as extra details. Start off with a BnW Spots3 node.
Use a Levels node to push the values closer to each other to define the spots.
Softly blend the result over the Blend node where we added the nerves (7). Our Detail Mask is now done!
Step 5: Shine like a Glossiness map
Welcome to the hardest step in this tutorial. The Glossiness map!
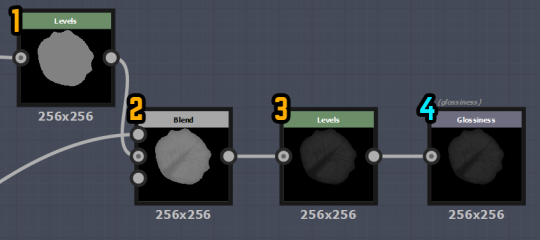
Just kidding :)
Grab the result of the leaf shape (Step1, Node 6) and attach it to a Levels node to push the white value down.
Blend this together with the mask we created in the previous step (Step4, Node10). Set the Opacity to very low.
Now add another Levels node to the mix to make the whole a lot darker. (By exposing these values in Unity, we can randomize the amount of gloss of a leaf.)
The Glossiness map is done!
Step 6: Wrapping up the Diffuse and Specular
Almost done! Now it’s time to add color to the Leaves!

First use a Gradient map on the outcome of the leaf shape (Step 1, Node 6). I’ve picked one of the brightest greens possible as a base color.
I used a Hue/Saturation/Lightness (HSL) node to alter the color for the edge and the nerves. (I exposed the values so I can change them in Unity.)
I used another HSL node to change the color of the leaf’s inside. (I exposed the values so I can change them in Unity)
With a Blend I combined the two, using the Mask (Step 4, Node 10).
Here I used another HSL node, again with exposed values. This way we can easily change the entire color palette instead of only the inside or outside of the leaf.
A little sidestep: I noticed that the thickness of the colored edge was always the same on each leaf, which I didn’t really like. So I decided to make the leaf a little smaller. I used a Levels node to flip the black and white values of the leaf shape (Step 1, Node 6) (Note: This is also possible with an Invert Greyscale node, just showing two ways.)
The Glow Greyscale node bleeds the white into the black.
The Levels node pushes the values closer together, forming a rounder shape than before. Creating the perfect mask!
Using the Blend node, we blend the colored leaf (5) with absolutely nothing. We do use the just-created Mask so that the leaf is now surrounded by transparency.
Our base is now complete, but I wanted something extra. I figured it would be cool if the end of the leaf would have a slight color change. So again, I used a HSL node to alter the colors a bit.
The mask we use for this is a simple Gradient Map node.
With the Transformation node we rotate this gradient 45 degrees and scale it inside the texture.
The Histogram Scan pushes the values closer together, creating a clearer ‘edge’.
The Blend node uses this mask to blend the original color (9) with the altered version (10). Giving the texture a more otherworldly feel.
The diffuse map is now finished!
The Specular map needs to be a bit darker, so we use a HSL node and adjust the Lightness setting.
The Specular map is now also finished!
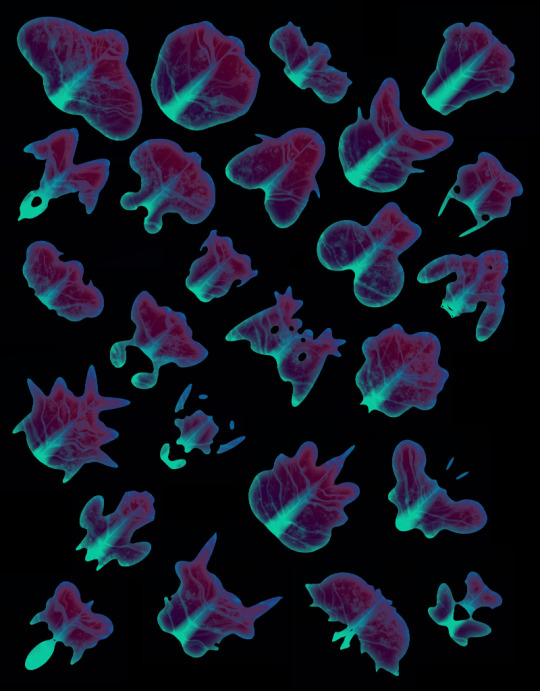
Here are some images of what happens when you change the random seed in Unity, which unfortunately doesn’t change the coloring yet!
Social media
We hope you enjoyed this tutorial! To follow our development updates, please check us out on Tumblr, Twitter, Facebook. Or subscribe to our newsletter. Whatever is your taste in social media!
Antegods is supported by the Dutch Cultural Media Fund, Cultural Industries Fund NL and the MEDIA Programme of the European Union.
Read more about:
Featured BlogsYou May Also Like