Trending
Opinion: How will Project 2025 impact game developers?
The Heritage Foundation's manifesto for the possible next administration could do great harm to many, including large portions of the game development community.
The technical and creative journey to create a wordless story for each gun design and foster an emotional attachment to each weapon.
December 18, 2024
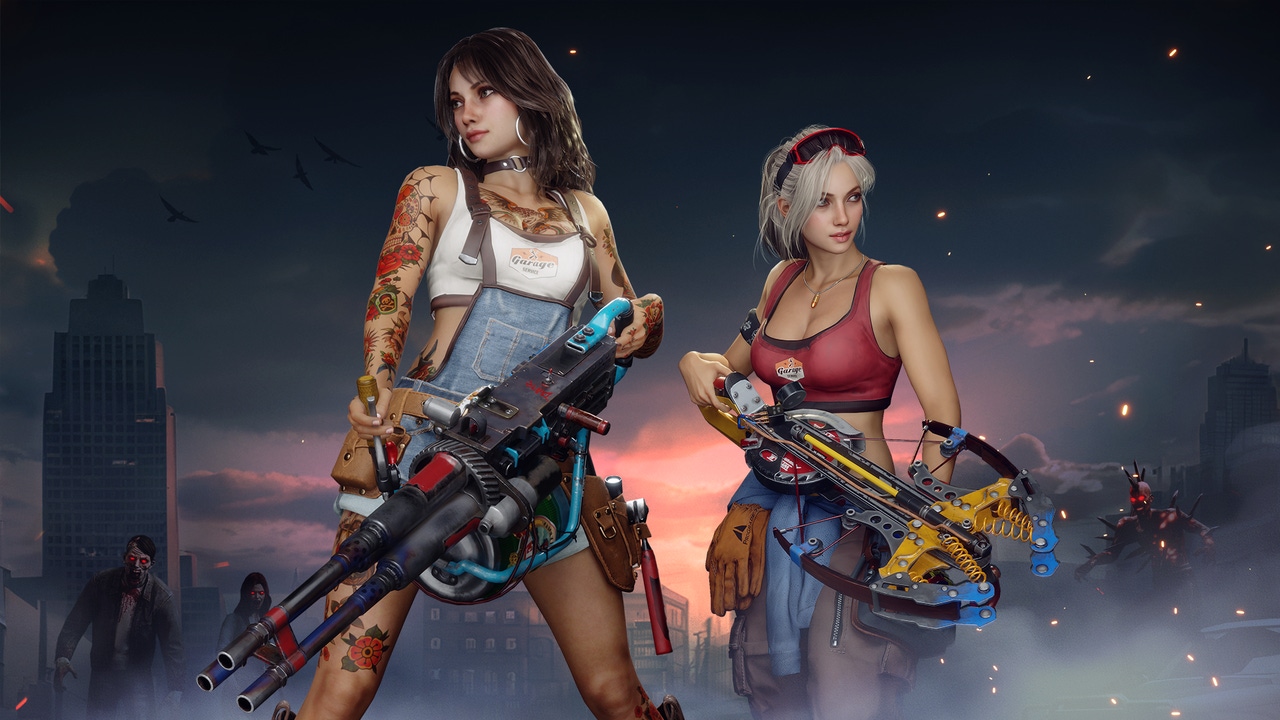
We’re the team behind weapon design for the mobile roguelike shooter Zombie State! As weapons are an integral part of the zombie elimination process, in this post, we’d like to share the creative and practical insights from our gun creation journey – from initial concept to final implementation in the game.
Here’s what we’ll cover:
Modeling and idea exploration
Animating shooting and reloading
Enhancing the shooting experience and player immersion
Here’s the list of people, who contributed to writing this article: Art Director Denis Pozdnyakov, Lead 3D Artist Valentin Penkov, Head of Animation department Vilsur Bulgakov, Game Designer Yaroslav Ivkin.
In game development, challenges often arise: concepts change, new features are introduced, and previous work may need to be redone. Zombie State was no exception. This is because midway through development, the team decided to overhaul the meta and gameplay.
While this risky decision ultimately proved beneficial, it’s worth noting that it required us to make significant changes under tight deadlines. The art team faced an ambitious task: to design and configure 15 entirely new guns in a short timeframe.
In terms of process, while game design handled configuration and balance, the art team focused on the behavior and visuals of the weapons; we received preliminary guidelines for the guns and were granted creative freedom in defining their appearance.
Weapon design is crucial in any shooter, as it directly affects player engagement, and our primary goal was to foster emotional attachment to each gun. Therefore, alongside the art team, we agreed that every weapon should have a unique character and a visually identifiable backstory.
We wanted players to envision the narrative behind each gun simply by looking at it. Of course, instead of relying on words to convey these stories, we set out to tell them artistically.
When creating weapons for Zombie State, we were lucky enough to enjoy maximum creative freedom – and, since our goal was to ensure that the weapons looked visually engaging, we drew inspiration from existing firearms while reimagining them in a post-apocalyptic style.
In line with our creative freedom, this involved adding distinctive, non-original components to give the guns a handmade, garage-crafted feel.
Another note: for Zombie State, we typically bypassed the creation of 2D concepts and began directly blocking out designs in 3D. This approach proved more efficient and visually informative, allowing us to place a "blank" version of the weapon in the viewport. This approach also allowed us to better understand how players would perceive it and identify areas that required further refinement. Due to time constraints, we opted for a more dynamic form of conceptualization.
In moments of creative challenge, it was particularly helpful to visualize how a weapon functions mechanically: how to hold it, reload it, and how various components operate and move. Each gun carries with it a rich backstory, detailing our thought process, the development of different ideas, and the meticulous addition of fine details.
In the next sections, we’ll showcase several examples of our creative process.
Ocelot Revolver: from initial idea to final production
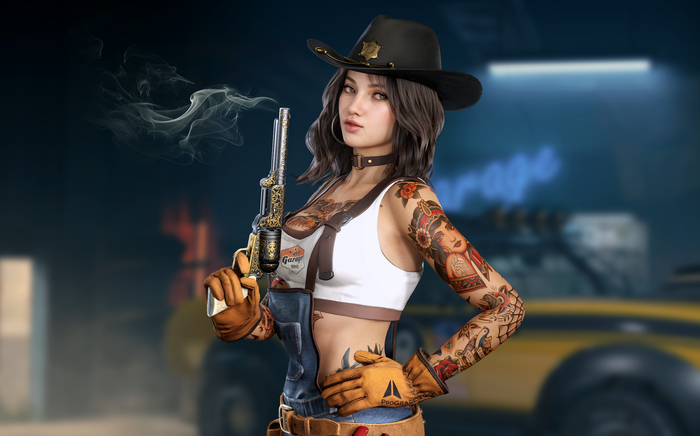
Here, we set out to create a rapid-fire weapon that delivers quick and powerful shots, despite having a small magazine size; these parameters guided our initial design. While we could have opted for a classic automatic pistol like a Beretta or Glock, we chose to go a different direction.
In our brainstorming sessions, we drew inspiration from Western films featuring Clint Eastwood. This immediately shaped our vision for the revolver's functionality, appearance, and animations. We designed the grip to be unconventional: instead of a classic hold, we opted for a hip grip with the supporting hand atop the trigger for quicker shooting.
The revolver also featured a unique reloading system: the bolt carrier lever had to be pushed down to access the cylinder. This design added an unusual, rugged aesthetic that enhanced the overall character of the weapon.
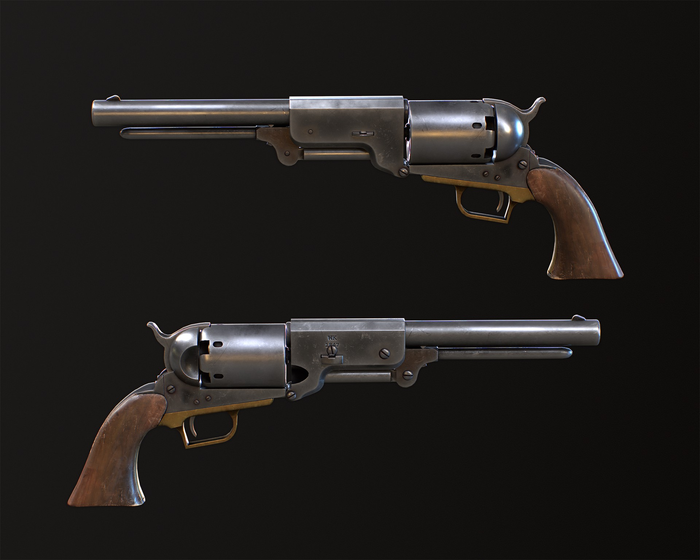
In this iteration, the reload animation took much longer than intended, resulting in the revolver feeling sluggish and counter to our initial vision. Displeased with this, we decided to completely redesign the weapon.
We conceived the idea of creating a museum-quality exhibit, as though the hero had retrieved it from an actual museum. Given this context, the gun needed to reflect that aesthetic: it should appear pristine, free from dirt or modifications, and possess intrinsic beauty.
We crafted an antique design featuring an ivory handle adorned with intricate patterns, as if it were a bespoke piece tailored for a heroic figure from a bygone era.
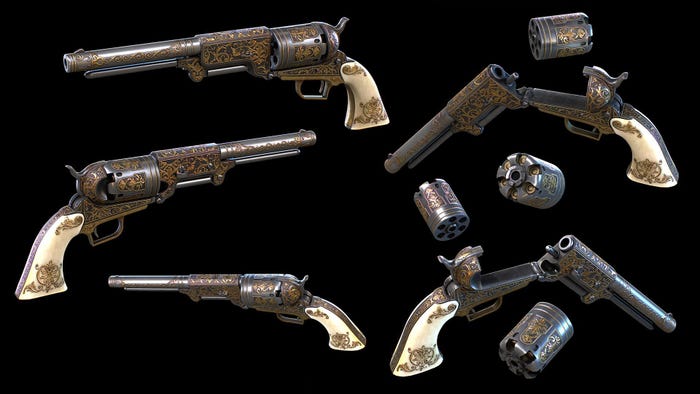
The weapon is fully visible from all angles, with no hidden polygons in the game model – the same model is utilized for gameplay, UI renders, and marketing.
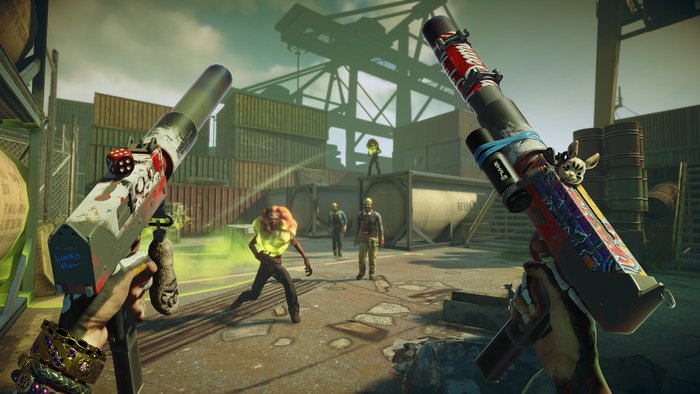
We determined there should be two submachine guns, as they embody classic gangster imagery.
However, we also aimed for each gun to have its own distinct personality. This led to the addition of a keychain shaped like a rabbit’s foot on one of the guns, setting the thematic tone for the weapon.
Subsequently, we incorporated other elements, such as dice, a rabbit head keychain, and graffiti paint, to further enhance its individuality.
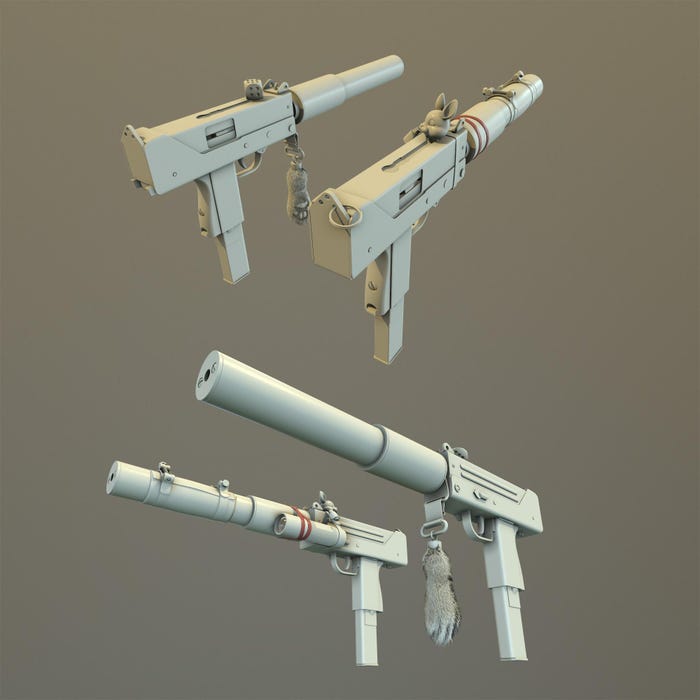
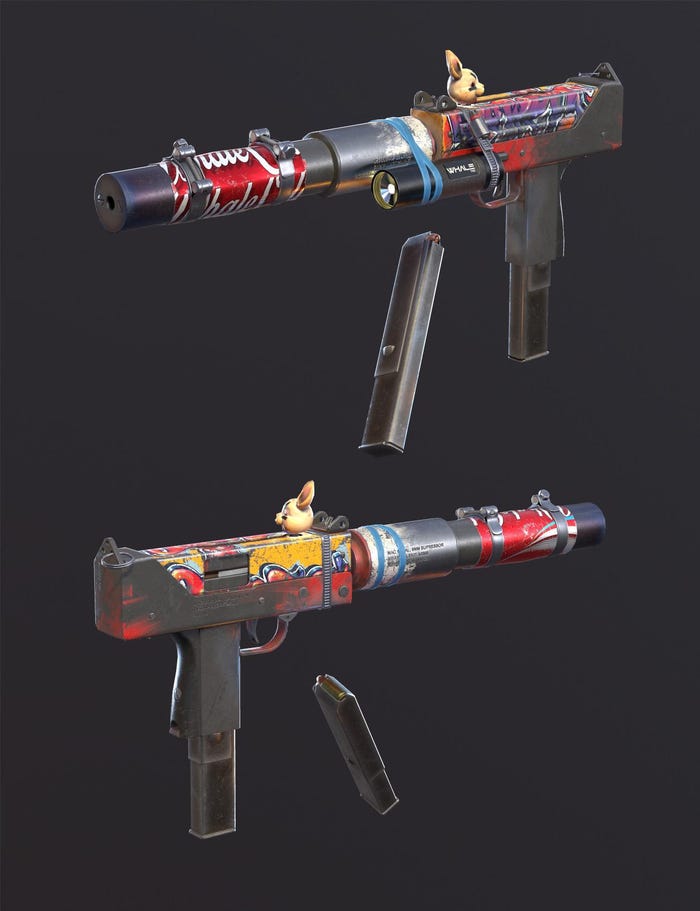
The animators incorporated dynamic dice for keychains and similar features, which brought a lively touch to the weapon.
Meanwhile, a burnt-out muffler was transformed into a handcrafted element, secured with a few clamps and a soda can.
Although both submachine guns share a similar base, we successfully created unique personalities for each with minimal resources.
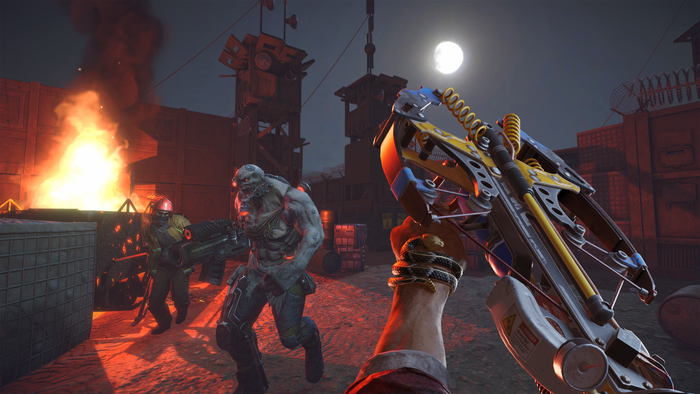
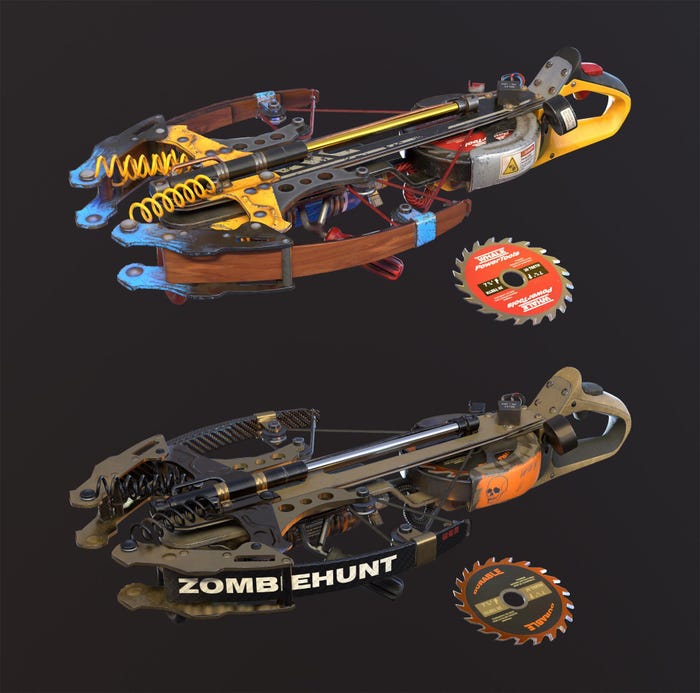
We needed a weapon with a wide horizontal hit zone, so we opted for a circular saw thrower. To emphasize its handmade nature, we designed the weapon as a DIY crossbow, assembled from chainsaw parts and other garage finds.
While the crossbow design logically suited the throwing of discs, it had a major drawback: a lengthy reload after each shot, which was impractical for gameplay. To address this, we implemented an electric/pneumatic reloading system – after firing, a pneumatic actuator pulls the bowstring back, while a sliding pin catches the disc. To enhance the visual complexity, we also added an electric relay and a pressure gauge.
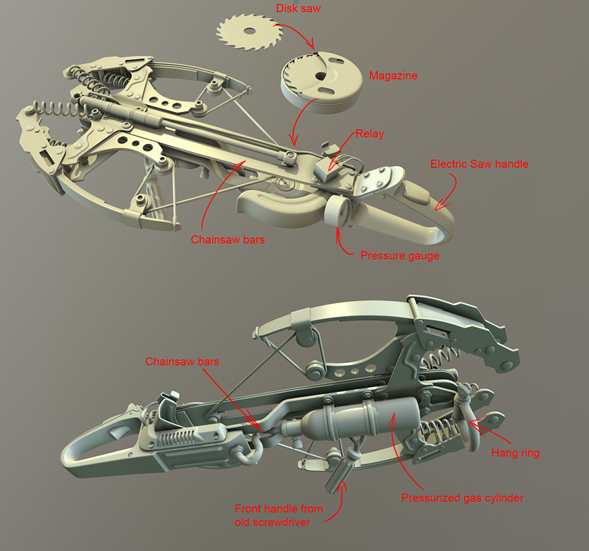
Since the weapon consists of parts from tools, the question of "how to paint" it, in general, was not a problem. We bake all this in Marmoset Toolbag, and texture in Adobe Substance Painter
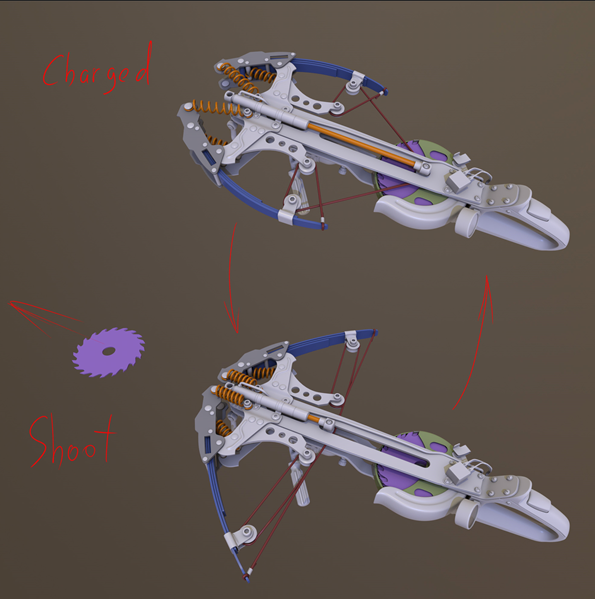
To make the work of animators easier, we sometimes create these sorts of diagrams – this allows us to more clearly show the operation of the mechanisms
When designing the minigun, our goal was to ensure it stood apart from the standard models while also reflecting a homemade aesthetic. The base of the weapon is a classic, large-caliber machine gun – but its defining feature is the rotating barrels, setting it apart from other machine guns.
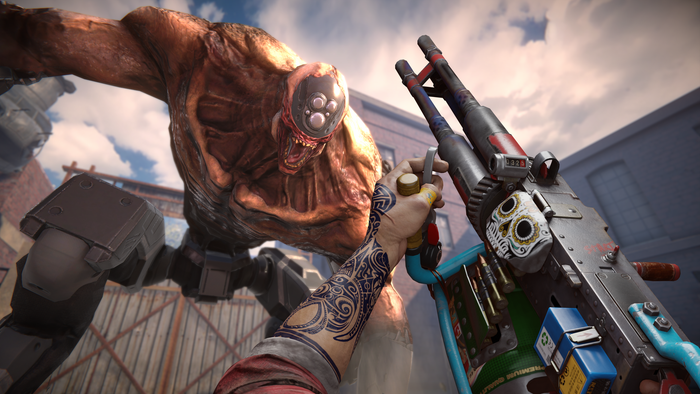
Again, we aimed to blend functionality with an intriguing DIY appearance. To achieve this, we connected several barrels via a common gear mechanism, using a modified car starter as the rotation motor, all powered by a battery with a quick-release mount.
But this was only part of the challenge!
We also needed to determine how the hero would hold and reload the weapon. After considering various options, we decided to construct a frame using pipes from an old bicycle. Additionally, since our design allowed for adjustable firing speed, we incorporated a bicycle gear shifter.
As a finishing touch, we repurposed a vintage bicycle odometer into an ammunition counter, adding an extra layer of detail to the weapon.
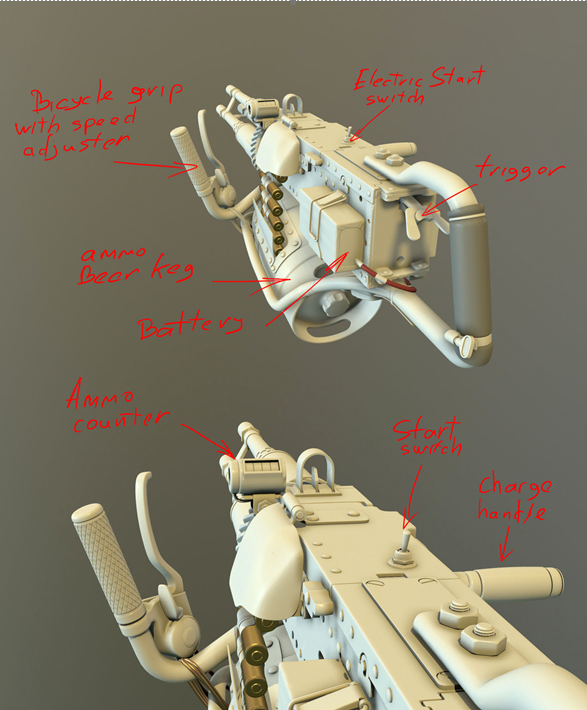
A small beer keg, secured with a car seat belt mount, served as an effective magazine. We also incorporated clamps, electrical tape, duct tape, wires, and switches throughout the design to enhance the "garage" aesthetic.
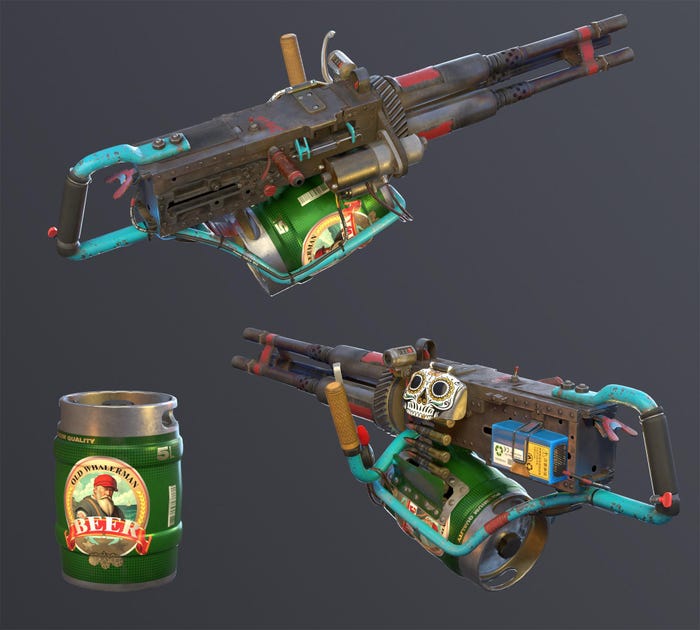
The imposing weight of the machine gun presented a challenge for handling, prompting us to position the grip on top for enhanced hip-fire capability and better balance.
However, this design posed a dilemma of its own: either the player’s view would obstruct the machine gun or their left hand would cover significant portions of the screen. Thankfully, by immediately creating a 3D concept block of the weapon, we identified this issue early in the development process, allowing us to streamline our iterations and avoid wasted effort.
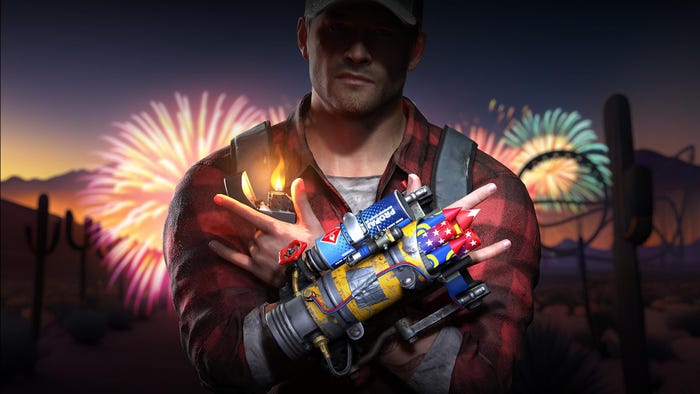
The firework rocket launcher was one of the most challenging guns for us in terms of concept, as it required us to create something completely out of the ordinary.
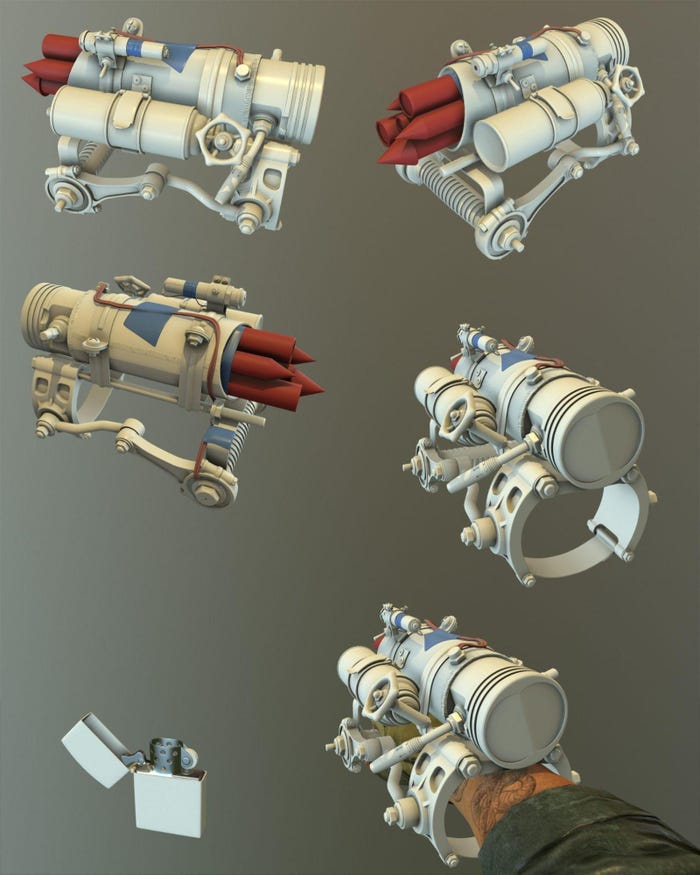
During our search, we came up with different versions of the flare gun: based on leather work gloves, tourist equipment, and a rocket made from gas cylinders. In the end, we decided that the weapon would look like a kind of hand-held construction assembled from "garage" parts:

Early concept blocking

Final model without textures
Now, once we envisioned the weapon as a glove, we shifted our focus to the design of the rocket launcher.
Our concept involved a tubular structure that would house an array of fireworks. And, instead of launching the entire collection, we designed it so that the "filling" of the fireworks would be the actual projectiles.
To enhance the glove's functionality, we incorporated an ignition system powered by a gas cylinder and integrated a built-in piezoelectric element, mirroring the ignition mechanism found in a burner and a lighter.
Additionally, we included a sight mechanism derived from a laser pointer, complete with a battery.
That said, we found the central tube to be rather uninspiring, so we decided to innovate by replacing the back portion with a car piston, while the connecting rods extended to the handle, adding a dynamic element to the design.

A page with references

Final result
The nail gun was the first weapon in the "garage" series.

This design was inspired by the real pneumatic tool, but we made several modifications to suit our needs. For instance, since the character couldn’t carry a compressor, we replaced it with a portable gas cylinder.

Additionally, quick reloading was a crucial factor, which posed a challenge with the original nailer. To address this, we reengineered the design to allow for cartridge-based reloading.

To add some visual complexity to the appearance, we also added a homemade collimator sight and pressure gauge

As a technical note: In Zombie State, our weapon models typically feature around 9,000 polygons, with pistols having a lower count of 5,000 to 7,000 polygons. Meanwhile, heavily detailed weapons, like the minigun, plasma gun, and saw thrower can reach approximately 14,000 triangles. We utilize shaders optimized for the Unity Universal Render Pipeline (URP), with diffuse, normal maps, and metallic/glossiness textures combined into a single texture map.
Essentially, our animators faced the challenge of capturing the unique shooting experience of each weapon without categorizing them as "strong and cool" versus "weak and nondescript." At the same time, the primary focus was on ensuring that gameplay remained enjoyable and engaging.
Recognizing that we were developing a shooter, we prioritized conveying a strong sense of each shot's impact. To achieve this, we divided the recoil effect into two distinct components: technical recoil and visual recoil.
Technical Recoil: This parametric system shifts the weapon's aiming point based on predetermined values established by our game designers, effectively moving the sight away from the location of the previous shot.
Visual Recoil: This encompasses the animation of the camera's position relative to both the player's hands and the game world. We utilized two separate cameras: one that rendered the world and another that focused on the hands. Each camera was meticulously adjusted to ensure a cohesive visual experience. The visual recoil also incorporated adjustments to the field of view (FOV) for both the world and the weapon-hand camera.
To facilitate the implementation of visual recoil, we developed a custom system that allows for real-time adjustments of camera behavior through curves directly within Unity, enhancing the dynamic feel of our shooting mechanics.
To create a realistic shooting experience, we developed multiple animations for each weapon and fine-tuned the parameters for transitioning between these animations. This meticulous approach allowed us to achieve a convincing result.
As we tested various weapons, we consistently adjusted the camera shake to find the perfect balance. At times, we had to tone down the recoil; while some shots looked authentically cinematic, they simply weren't conducive to comfortable gameplay.
Initially, we established a dual-skeleton architecture for male and female hands. This structure enabled us to efficiently transfer animations between the two skeletons, allowing for minimal adjustments and ensuring consistent behavior across different character models. If needed, we can easily customize a weapon or a complete set for specific characters or weapon types.
Along with this pipeline, we had several alternative content preparation pipelines. Since the deadlines were tight and it was necessary to make a large number of high-quality weapons, content creation did not stop.
At the same time, engineering solutions that did not suit us in terms of the final result, and most importantly, our control over it, were routed off in parallel branches. The engineers, of course, advocated for unification, automation and simplification, but we wanted “exactly that recoil”, “exactly that camera behavior”.
Collaboration with game designers was essential; often, the parameters they provided for the animations didn't align with our vision. Yet, through discussions and iterations, we found common ground. The designers’ willingness to adjust these values greatly empowered the animators, resulting in a more cohesive outcome.
Before animating a weapon, we conduct in-depth analysis with the modeler. We examine which parts can be animated innovatively, focusing on key mechanics such as firing and reloading. Additionally, we brainstorm elements that can benefit from dynamic setups. For these, we developed our own solver, which has proven effective in enhancing the overall animation quality.

After discussions with the modeler, we make a rig for the gun and set the basic pose; this pose is iterated and finally approved by the art director. The main goals of this basic pose are as follow:
Correct composition in the frame
Maximum exposure of the weapon to the player. We change the FOV of the camera drawing the weapon, and also change the position of the camera relative to the hands. If necessary, we can even "turn" the gun towards the camera so that the weapon looks as advantageous as possible
Of course, we cannot forget about the point of interest! It's important not to block the right side of the screen, otherwise a cool gun with mechanization (which looks great in the frame) will turn out to be a headache, because it blocks part of the battlefield. We’re looking for a compromise between beauty and functionality
Here’s a video with the animations for all the weapons
Crafting the shooting experience: from ammo to fire rate
In developing our firearms, we drew inspiration from successful games in the genre, aiming to create a compelling and intuitive mechanic that differentiates each weapon.
Our setup includes four types of ammunition:
Base Ammunition: This is the ammo used by the starting guns at the beginning of the game, with players enjoying an unlimited supply.
Light Ammunition: With a high capacity of up to 450 rounds, this ammo is utilized by machine guns, submachine guns, miniguns, and similar weapons.
Heavy Ammunition: Featuring a moderate reserve of 80 rounds, this type is reserved for shotguns, powerful revolvers, and other high-caliber firearms.
Special Ammunition: Limited to 30 rounds, this ammo is used for specialized weapons like the rocket launcher, saw gun, and plasma gun.
A key aspect of the shooting mechanics in Zombie State is the automatic firing system. This is where players do not need to tap the screen to shoot; instead, they merely aim the weapon at an enemy, and as long as the target remains in their sights, the weapon will continuously fire.
The shooting experience is influenced by various factors, including rate of fire, magazine size, and delay between bursts. This combination ensures that each weapon feels distinct and unique.
Additionally, the weight of each weapon affects the hero's movement speed; for instance, wielding a minigun slows the player down, while using a SMG allows for faster movement. This dynamic creates a tangible sense of heft and serves as an essential balancing factor, as movement speed plays a crucial role in player survivability.
Each weapon, along with other damage sources, is equipped with impulse settings for the ragdoll animations of defeated enemies. Different weapons produce unique effects: enemies hit by a flare gun are thrown in various directions; those struck by a blast from a revolver are knocked back; and enemies shot with pistols simply collapse to the ground.
Among the many features enhancing the shooting feel, it’s also important to highlight the recoil system (which includes sight shift and recoil) and bullet spread.

Weapon Recoil Parameters
The bullet spread for each weapon is meticulously calibrated to account for various external factors. For instance, shooting while standing still results in much greater accuracy, whereas jumping from an elevation sharply reduces accuracy. Continuous fire also impacts precision, making the initial shot considerably more reliable than subsequent ones.
We adjust the actual bullet spread separately from the visual representation seen in the sight. The sight reacts more dramatically to increases in spread, creating the illusion of a wider dispersion. As a result, players may feel that their aim is compromised, even though the bullets may still cluster closely together.
Given that we utilize an auto-fire system, several parameters are particularly important:
Time to Initiate Shooting: This refers to the delay after the player aims at a target before firing begins. Rapidly moving the sight left or right can accumulate this initiation time, potentially delaying the shot.
Trigger Sphere: An invisible sphere surrounding the enemies activates the shooting mechanism (though it is not a collider).
Aim Assist: This feature simplifies aiming using virtual joysticks, enhancing the player experience.
We also made numerous small adjustments to enhance user experience. For example, all weapons automatically reload when transitioning between rooms, and picking up a new weapon always provides one loaded magazine, even if the player has zero rounds of that ammo type. This ensures that players can immediately gauge the capabilities of their newly acquired weapon.
***
Our goal was to craft unique and memorable weapons that not only functioned effectively within the game but also visually conveyed their own narrative. Each gun, from the Ocelot revolver to the minigun, possesses distinct characteristics and a unique identity, adding depth and variety to the gameplay experience.
Creating weapons for Zombie State was complex and creative with multiple stages. Along the way, we encountered various challenges that often required significant efforts to adapt and rework existing assets. Ultimately, we believe we have succeeded in our objective: each gun in Zombie State is not only functional, but also unique, with its own story and character.

You May Also Like