Trending
Opinion: How will Project 2025 impact game developers?
The Heritage Foundation's manifesto for the possible next administration could do great harm to many, including large portions of the game development community.

Featured Blog | This community-written post highlights the best of what the game industry has to offer. Read more like it on the Game Developer Blogs or learn how to Submit Your Own Blog Post
We’re going to analyze a few of the audio samples created for Bite the Bullet, and how they work to support the game’s feel, and take alook at the basic sound design skills that can be practiced on any DAW (digital audio workstation) of your choice.

Being an avid player and collector of video games, I became very interested in how all these sounds of the past were created. I’ve always had a passion for creating video game music, and it’s what led me to become a video game musician and sound designer.
Designing sounds for fictitious characters and places is an art form and opens unlimited possibilities for creativity. The goal of a sound engineer is to work with the design and animation team to create audio that fits into the virtual world.

Bite the Bullet is an upcoming PC release from Mega Cat Studios. It’s a 2D RPG Run, Gun, and Eat where you must devor enemies to power up your character, weapons, and abilities. You can eat pretty much anything, and your body type will change depending on your diet.
We’re going to analyze a few of the audio samples I created for this project, and how they work to support the game’s feel, theme, and universe. Furthermore, this blog will teach you basic sound design skills that can be practiced on any DAW (digital audio workstation) of your choice.
Download the example soundpack here
I’ll be using Ableton Live 10 for these audio examples, but there are plenty of music programs that are just as good. Choosing the right DAW for you really depends on the way in which you want to create, personalize, and organize your sound production.
Live really gets me in a creative mindset instantly, and I think of creating sound in a different way using it. Live makes it easy to organize, warp, mix and master audio samples and the journey along the way is as fun as playing video games. Other good DAWs I recommend are Cubase and Pro Tools.
When gathering audio files, a good sound designer utilizes these 3 methods:
Recording your own sounds.
Collecting licensed stock sounds from the internet.
Creating sound from virtual instruments and synthesizers.
Let's take a look at each of this.
If you’re serious about sound design, I’d recommend purchasing some decent recording equipment and start building an audio library. In my opinion, recording is the best method to attaining sounds - they are inherently unique and your own. I've recorded more than 10,000 samples and have built a huge library that I use frequently for sound design.
Capturing a crisp recording is a must, consider purchasing a portable recording device. The Tascam DR-40 has two built-in condenser mics that can get the job done. Plug-in a higher end mic or a shotgun/boom mic to achieve the highest quality sound you can afford.
Most days, I carry my Tascam Dr-40 with me. You never know when you'll hear something that could be used for a video game.
Another great tool is the PO-33 Knockout. I take it on trips and record samples and create short music loops. The sampler records in very low quality, so its not practical for high quality production, but it’s an easy way to record and warp sounds. It can plug into a record player too! Perfect for editing vinyl samples and creating Lo-fi beats.
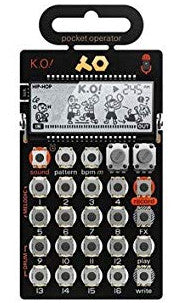
Record everything. Kitchen items, vehicles, industrial noises, nature, weather, grab a stick and bang on everything (excluding humans and animals). Then move onto Foley sound design.
Foley Recording is used post production for film and video games. Most of the sounds recorded on set don’t end up being used because they can be better recreated using different Foley techniques. These involve using various objects/tools to recreate natural sounds. Sounds can be reimagined in an acoustically treated studio for much higher quality capture.
For example, the sound of a leg breaking in half can be recreated with a pistacho between two steel plates being crushed, whilst gutting out a pumpkin. Our brains analyze visuals first, and connects the sound of the visual after.
Because of this, we can sort-of manipulate what the audience thinks they hear. Additionally, by enhancing the audio beyond the natural sound, awe don’t have to really break anybody’s legs.
Here are some fun Foley Recording guidelines:
Stabs
gooey gore sounds from spaghetti, gutting a pumpkin, and smashing various large melons.
sword/blades from kitchen utensils
weapon ‘woosh’ sounds from swinging a stick through the air
Wind
pillows rubbing against the carpet floor
shaking a twig with leaves
blowing into an empty plastic soda bottle
Horse Gallop
coconuts
There are numerous digital repositories of SFX available online. Examples include Splice, Digital Juice, and freesound.org
You'll want to utilize these sites for more of a resource rather than a crutch. You should first attempt to create the audio yourself. The games audio should have its own uniqueness. Overusing stock sounds just makes it sound like the many other games that do the same.
However, there are top of the line sound effects online that you just can’t beat with your own recordings. If you’re in need of a lion roar, and there’s no lion in your backyard, you’re better off finding a royalty free file online. This also applies if your having trouble creating the sound via your own techniques.
Digital juice is an interesting sound resource. The sounds they provide certainly don't stand well on their own, but can be useful for layering. Splice focuses more on music samples, but has some great foley and sfx sound packs that can be used for games.
No matter which resource you use, make sure to read the fine print when downloading sounds. Look for royalty free or creative commons. Courts in the U.S. have ruled that any sample that is still recognizable from the original cannot fit under the fair use exception to copyright.
This is to say, if you don’t know if the stock sound you acquired is free of copyright, you’ll need to edit the sample in a way that makes it virtually impossible to distinguish what the original sample was.
Designing sound with synthesizers/software is a dynamic and vast discipline. Electronic synthesizers and sequencers are the foundation of the video game era, and I like incorporating the nostalgic 8-bit chip sounds into my audio when applicable.
If you’re interested in learning to create authentic music and sound for retro consoles, I’ve written a few guides on the subject, I’ll link them below. 8-bit, and 16-bit sounds have a retro aesthetic, and can be a great choice depending on the game’s genre and graphics.
Creating Music and Sound for the NES
Creating Music and Sound for Super Nintendo
Creating Music and Sound for the Sega Genesis
There’s an unlimited selection of electronic instruments to choose from and they all work differently.
Serum -powerful wavetable synth
Synplant- create synths in a unique and creative way using an unconventional interface.
Kontakt -sampled synthesis and instruments
Arturia CS-80V -synth that has all the original parameters of the vintage Yamaha CS-80
Synth1 -probably the most capable and diverse free synth
Omnisphere -versatile and powerful synth
Keep in mind that the more synths you own doesn’t make you a better sound designer - becoming better-skilled and more knowledgeable at one capable synth is far more valuable. I recommend becoming proficient in a synth that has four oscillators. Four oscillators=more layers=more diverse sounds.
If you happen to be using Live 10, try out Wavetable. It’s a built-in instrument that has a great snapshot feature that lets you visualize the sound that's being sculpted. Experiment with these synths using a midi keyboard or drum pad. Turn every knob on the interface to better understand what each of them do and start creating your own presets.
You'll also want to get a MIDI instrument. A MIDI instrument connects to your computer and is used to experiment with synthesizers and other digital software. Start playing around with notes and samples. The Masterkey 61 and the Launchpad Mk2 have been valuable tools for my audio production.
When designing a sound effect for a game, you should approach the process with a wide, holistic scope. Consider all the various ways to achieve the design, all the factors that might impact the sound as it is being created in the game world, and then use the most appropriate and effective techniques and methods to achieve that sound.
Let's take a look at a boss in Bite the Bullet. Inspect his body size, equipment, and attire. Make a list of what his audio characteristics would elicit if this creature existed in the natural world and you’re merely five meters away.
Let’s start with the vocal characteristics. Larger mammals in nature tend to have lower ranged vocals, and since this guy is a massive piece of muscle, duel wielding sextuple rocket launchers, we’re going to make his roar super powerful and bassy. A simple and effective method to achieve this roar is to obtain vocal recordings and add audio effects
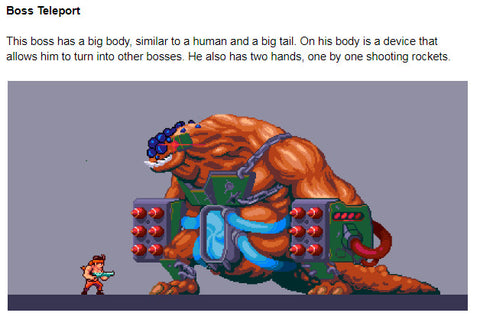
It was a tough decision, but I decided to select myself to be the voice of this totally badass boss. I went for a raspy, death metal roar (please don’t injure your vocal chords when recording boss and death SFX).
When recording on your handheld device, make sure the input level is near 0db. If the input is too low, there will be unwanted whitenoise when you invariably have to increase the volume. If the input level is too high, sounds will peak and become unusable pieces of distorted trash.

Raw vocal recordings found in ‘Boss Roar’ folder
Now that I have the samples inserted into Live, I’m ready to experiment and start sculpting the audio. Since my vocals are in the medium frequency range, i'm going to pitch shift the samples 8 semitones down. This gives the samples a lower range, forming my vocals to sound like a large beast.
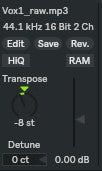
After selecting and layering a couple short vocal roars, I copied the Vox2 sample(bottom sample) and pitched it down even further (-13 semitones.) The copied sample will be used to enhance the bass.
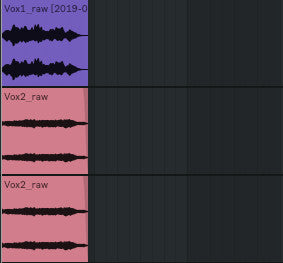
Notice how the samples start and end at the same time? Even though we’re using multiple vocal layers, we want to make it seem that the roar is emanating from a single voice. Having the layers start and end in sync blends them together in the mix.
Here is the audio effect chain for the vox2 copy. As you can see I cut the high frequencies and turned up the bass frequency(roughly at 90Hz.) I added multiband dynamics to compress the sound, and a saturator to warm up the lows.
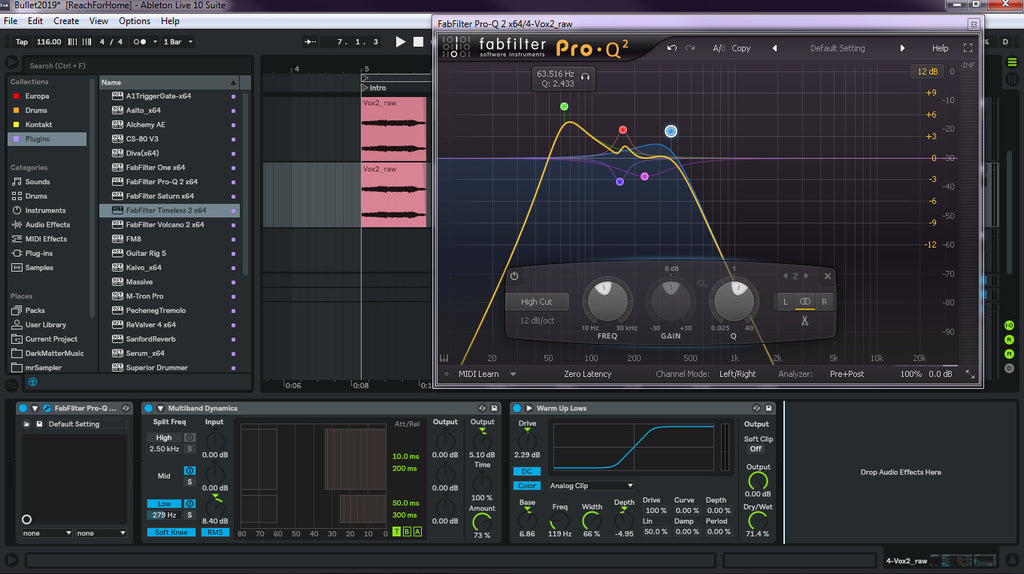
This adds a sub-bass undertone for the roar.
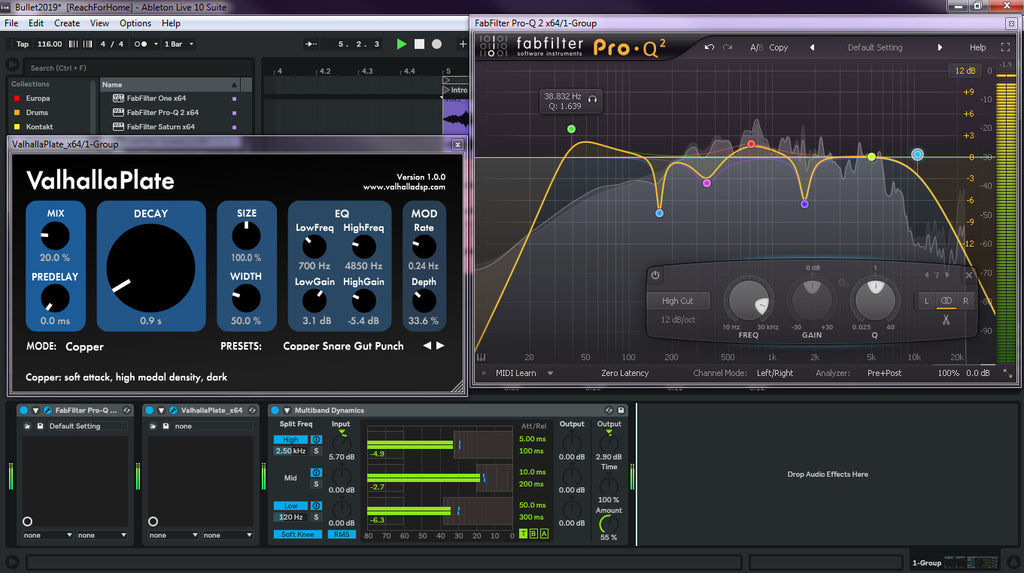
Next, I put the 3 samples into a group channel to add the same effect to all 3 simultaneously. I added a reverb effect(Valhalla Plate) to give the roar a proper presence in the environment.
This boss battle occurs in a large room with steel walls. Adding reverb(which is synonymous with an echo) will replicate sound waves bouncing off objects, structures, and mountains in the natural world. Put yourself in that room, and envision your ears analyzing the sound of that protruding roar. The decibel would be loud and bounce off the walls, creating an echo.
I added an EQ effect to enhance the sound even further, ensuring that the best parts of the SFX really pop! Lastly I added multiband dynamics to give the sound a more equalized volume. We’ll get into more of multiband dynamics/compression later in the guide.
These are very basic effects that I used, and you should really experiment beyond this and try out all the audio effects built-in to the DAW. Here are some other built-in ableton audio effects you should utilize:
Vocoder
Frequency Shifter
Chorus
Resonators
Saturators
For Roar_2, I implemented some automation for a granular saturator. Automation is great for when you want to change an effect knob whilst playing through the sample. In this case, I increased the Dry/wet level of the effect and slowly faded the effect out before the sound ended. This adds some expressive elements to the sample.
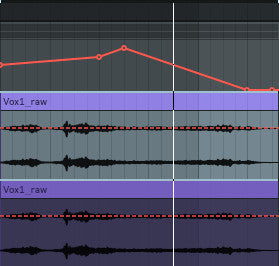
I was able to create 11 roar samples from these recordings. They could be better no doubt, but they’ll suffice for the first wave of audio implementation.
I exported any vocals that may be proven useful. Even though I created 11 samples, I may end up only using 6 of the best picks. Quality is better than quantity when it comes to sound effects.
If you’ve stumbled upon an alluring sound that’s not quite applicable to the current task, be sure to save it! 99% of the time, the sample can be used for future use. Whether its for ambience, characters, or the snare in the next top 40 dance hit, I can earnestly say that you can sculpt an audio sample into something useful.
*pew pew pew*
Let’s take a look at the RailGun weapon. It gives me similar vibes to the Railgun in Quake3, so I’m going to use that sound as a reference.

Recording actual gunfire can be problematic: gunshots, more often than not, are far too loud to get a decent recording. Furthermore, realistic gun sounds sound puny compared to designed gunfire.
Most, if not all in-game gunshot SFX, are designed, and the key is to use layers. We want to ensure the weapon shots are powerful, and immure the players mind into feeling like the weapon they’re holding is profoundly epic.
The Railgun shot should have these elements:
A high-ranged sniper beam “pop” suppressed
Gun exhaust/ powering down
Mini-engine powering up after shot
Low bass “pop” with reverb
For the sniper beam pop, I used a synthesizer called Synplant. It takes a genetic approach to creating sounds.
What this means is that rather than the usual turning of dials and knobs to adjust, Synplant creates patches by planting seeds, growing flower stems, and mapping the plants DNA.
It has quite a distinctive interface that really lets the creative process flow more freely. The sci-fi sounds I can get out of this thing makes it a perfect candidate for futuristic weapon designs.
Check the RailGun folder for synplant and raw recording layers.
And BOOOM, here’s the railgun layers.
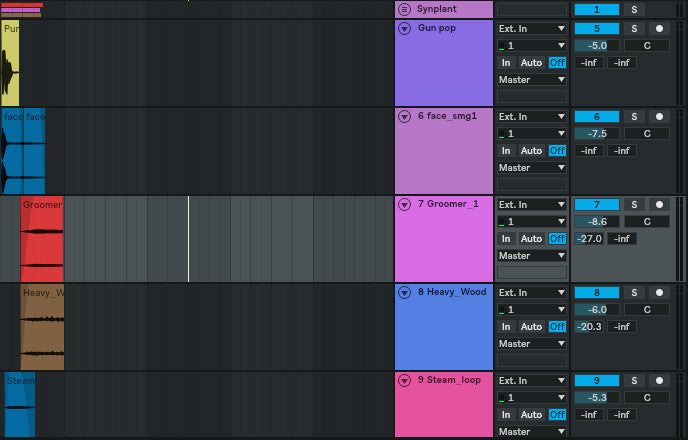
Let’s break down the layers, and how I sonically shifted them into a weapon shot:
Channel 1
I used three layered synplant patches to create a laser beam “Zap.”
Channel 5
I used a “boxing punch” stock sound from splice.com
This is for the low sub pop
Channel 6
Raw recording of a friend shooting an SMG
This is for the high-end pop and natural echo off the mountains (okay fine, sometimes its cool to use a raw gunshot recording).
Channel 7
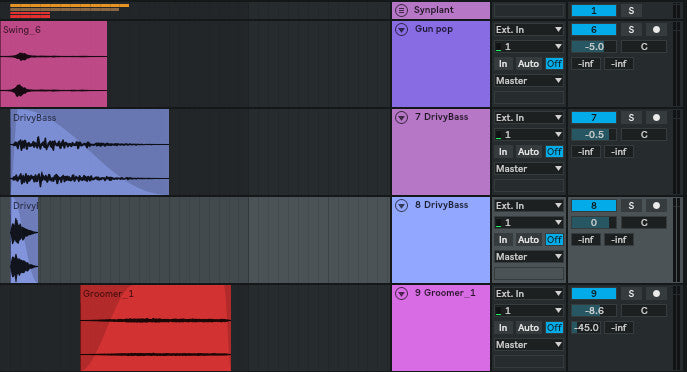
Raw recording of a large groomer being driven in the snow.
This is for when the gun powers up
Channel 8
Raw recording of an old chair that creeks.
Used for when the gun powers up
Channel 9
Raw recording of water steam on a cooking pan
Used for gun exhaust when powering down after the initial gun pop
For the RailGun_2 example, I followed the same elements using different sounds and effects.
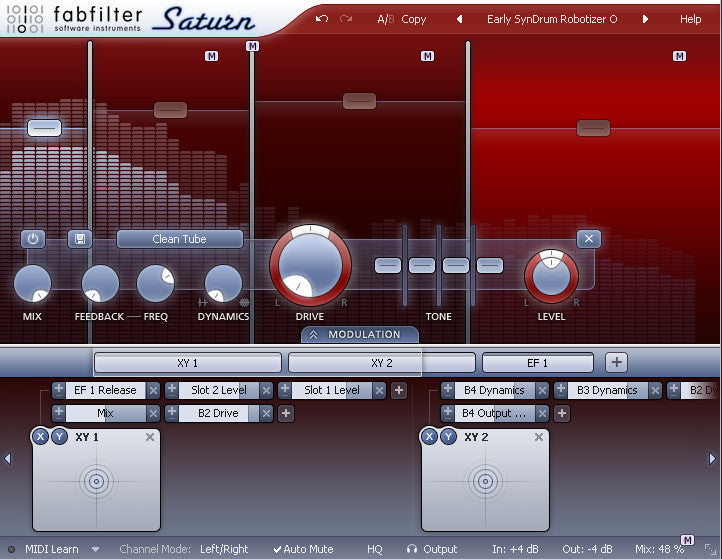
Fabfilter Saturn is a distortion and saturation plug-in with a large amount of presets. This saturator is fantastic at altering sound, and the presets are great to sift through and experiment with. I used this for the groomer sample, to give it a bit-crushing robotizer effect.
You’ll definitely want to load up a gameplay video to your DAW to properly time the SFX. Load a video file onto Ableton by dragging and dropping it into Session view. This enables you to make precise designs that match the animations correct timing.
If the video doesn’t seem to be loading, try another video format. Ableton 10 supports (.mov, mp4 or .avi.) If you’re still having trouble importing a video, download Haali Media Splitter aka MatroskaSplitter.
I thoroughly enjoy designing ambient loops, it really unlocks the potential for creativity. Painting the “audio canvas” for a non-existent, sci-fi tech bio lab with triple-heated manganese steel doors (complete with versatile track configurations) is very entertaining.
Multiple layers is the key. Some of my ambient tracks can have upwards of 15 channels. Ensure that the volumes are balanced and not too overbearing. Ambient tracks should be near the -12db range when exporting. (Ambient loops don’t need to be normalized to 0db.)
Let’s take a look at one of the Biolab rooms
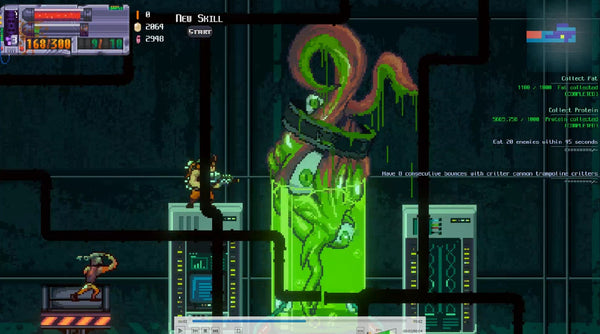
The room has a massive interior,with metallic walls that soar several meters in all directions. There’s a large pod in the center, containing green goo and a squid mutant, with two electronic systems.
In such a scene, there would be electronic/computer sounds, perhaps some growls or other utterances from the seameat beast, some squelching liquid sounds, and maybe some pneumatic sounds for that lift over to the left. Additionally, the room is encased in metal, so we need to take the ways that metal reflects sound into consideration.
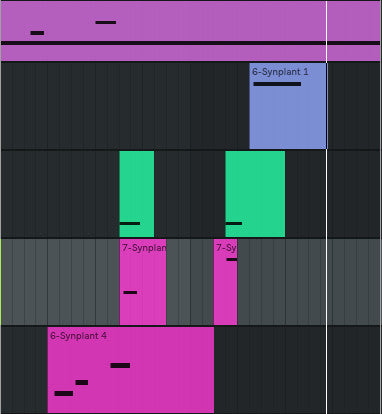
Bio_Synplant_atmos: I’m using Synplant to design some electronic beeps and boops for the dual computer systems.
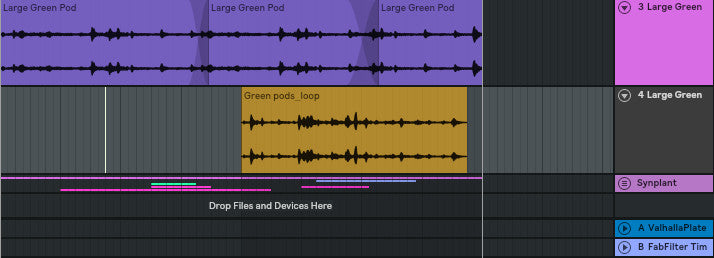
For the green pod, I recorded water from a bottle, sink, tub, and found some underwater sounds from Splice. I used a car engine for the pod's system power. After designing three ambient tracks individually, I layered and mixed them. I created a loop and exported in both mono and stereo.
Next I designed individual ambient tracks for old pipes, and steel echoes. These will be layered over the main underlying track during the implementation process.
Due to the constant shift of environment, I created a bunch of ambient layers that fade-in and out depending on where the player is at - for example, fading out audio for a room when exiting, whilst the next room you’re about to enter fades-in audio, all while the underlying wind loop continues to play.
Now that we’ve covered a few sound design examples, let's talk about mixing them.
My master audio rack usually contains these effects: Multiband Dynamics, Limiter, Utility, and EQ

Glue compressor is also useful in the master chain.It’s used to glue elements together in the mix, I used it for one of the roar samples.
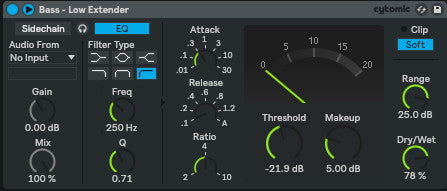
The topic of compression deserves it’s own blog, but let me try to break it down in as few sentences as I can. Compressors modify the dynamic range of the audio sample. It reduces loud frequencies above the threshold and can increase the output gain. Essentially, it reduces the dynamic range of the sound and can make it louder in the mix.
In today’s audio-world, loudness is perceived as better. Compression makes the audio sound bigger and more crisp to the ear. Only use a compressor if you know what you are doing, and study more on the subject before slapping it onto your audio channels.
Exported sounds should be in MONO, using the utility audio effect in the master chain. In-game audio needs to be pinpointed to a particular object/character.
To properly do this, we’ll need to centralize the sound. Monophonic sound is intended to be heard as if it was emanating from one position. When placing sounds in a 2D universe, the sound needs to be centralized and move freely throughout the stereo 2D space. A good example of this are footsteps. As the enemy moves toward the center of the screen, the footsteps should move with the animation in the stereoscopic environment.
There are several techniques I used to equalize my SFX.

Artificials below 80 hz aren’t of much use in my opinion. Low frequencies muddy the mix. Lowering or muting said frequencies will provide the sample with a sharper, clearer mid and high range.
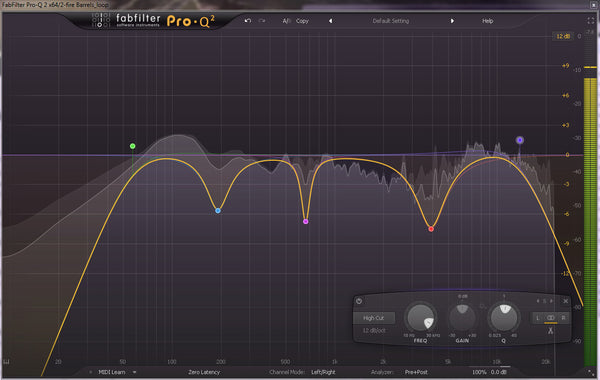
Find the unpleasant frequencies and lower the volume. Get rid of the muddy sounds on the low end, and cut the sharp piercing sounds on the highs.
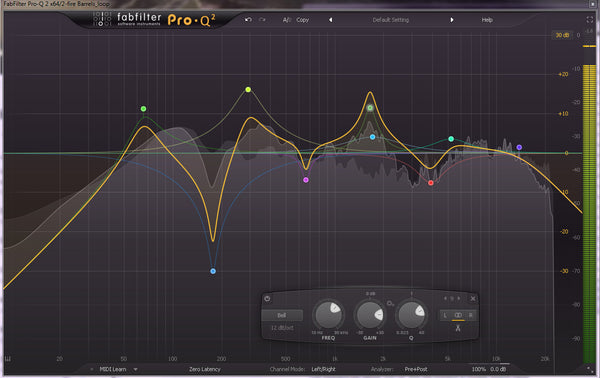
Enhance the pleasant sounding frequencies by giving them a volume boost. Fabfilter Pro lets you listen to each frequency on the spectrum individually. Listen to each frequency and decide if it benefits the audio sample. If it sounds good, then it is good.
Now that you've created some SFX, it's time to get them over to the dev to add to the game.
As a reminder, here’s a list of software I used:
Export your sounds in wav, mp3, or ogg format. Normalize sounds to 0db. Organize and zip the folder. The sound assets are now ready to get implemented into the game for testing!
Certain SFX won’t be as applicable as you might of thought, and will invariably have to be redone, but relax, this is all part of the process. Giving a sound effect a second pass usually improves it dramatically. The final stages of audio in games is adjusting the volume and adding Unity audio effects.
Sound design and implementation can be handled by a single person, but for this guide, I focused mainly on design and production. Hopefully this guide gave you a few good tips on creating audio for video games! Now get out there with your handheld recording device and start banging on the Earth with a bag of oranges.
ABOUT THE AUTHOR: MITCH FOSTER, MEGA CAT STUDIOS
Mitch is an audio engineer and composer
http://www.mitchfostermusic.com/
Want to lend a hand in the kitchen? Join the Mega Cat Discord here!
Can't wait to shoot, cook, and eat? Wishlist Bite the Bullet today!
Read more about:
Featured BlogsYou May Also Like