

Trending
Opinion: How will Project 2025 impact game developers?
The Heritage Foundation's manifesto for the possible next administration could do great harm to many, including large portions of the game development community.
Featured Blog | This community-written post highlights the best of what the game industry has to offer. Read more like it on the Game Developer Blogs or learn how to Submit Your Own Blog Post
A simple workflow to bring a level layout designed in Photoshop into Unity for greyboxing

As a level designer, quickly coming up with a blockout of a level design and playtesting it is an important step in creating the level. This is something every level editor should have as a basic feature. When I started designing maps for one of our upcoming shooter game in unity, I realized that there are no direct tools to create blockout of a layout.
I came up with an easy process of designing the layout in Photoshop, importing it and greyboxing it in unity using the basic cube primitive. This not only allowed me to iterate my levels quickly but also allowed me to keep them optimized since it uses box colliders instead of mesh collider.
I hope that the workflow I am mentioning below comes in handy for others as well. So let’s begin.
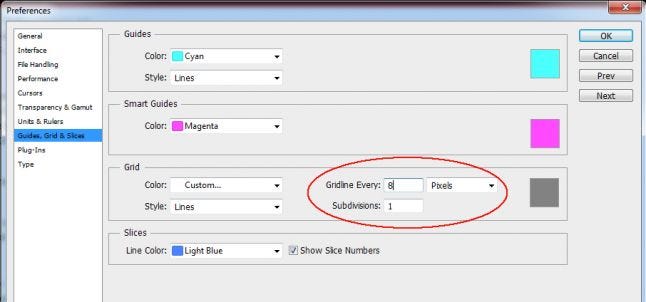
For designing layouts set the grid settings to 8 pixels and subdivisions to 1. This can be a larger value but a small grid value allows fitting large layouts in a small image. This makes it easier to edit without zooming in.
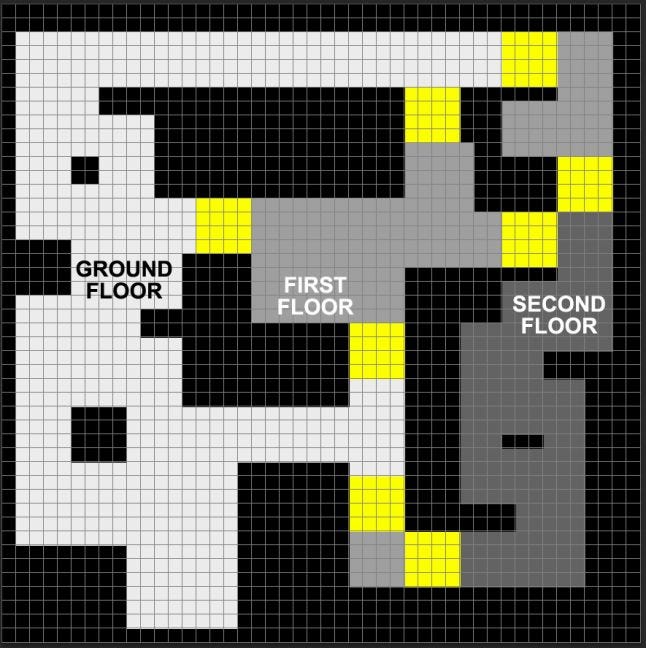
Once the grid is set, design the layout for the map using the grid as reference. Each grid cell represents one unit of area in Unity which I will explain in the next section.
Save this layout to your unity project as a jpg image.
Once the design layout is ready, it’s time to import this layout out in Unity and create the greybox so that it can be play tested for validating the flow of the map.
The grid system of unity is dynamic which changes as we zoom in or out in the viewport. This doesn’t help if we want to get the dimensions right and becomes difficult to work with. To solve this one of my programmer friend wrote this small script for me to generate a grid in the editor. You can download the script from the link below.
Copy the script to your unity project. To enable the script in your scene,
Create an empty game object. Rename it to EditorGrid
Add the script to this EditorGrid gameobject.
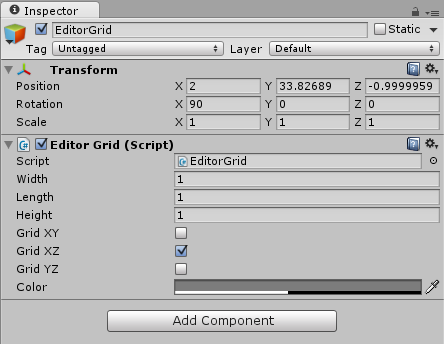
The script allows you to set the grid size for each axis, enable/disable it on individual planes and also to change the color of the grid. Leave it at the default settings for now.
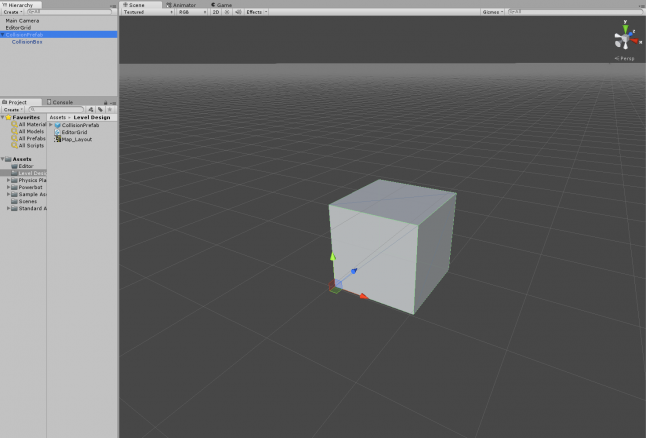
The primitive cube of unity has its pivot set to center. If you scale this, it always scales from the center. I wanted something which could be scaled from one side while the other side stays in place. For this I create a custom game object with the cube offseted by .5.
Create and empty game object called CollisionPrefab at position 0.
Create a cube and make it the child of CollisionPrefab created above.
Set the xyz position values of this cube to 0.5.
Create a prefab of this by dragging the CollisionPrefab to the project window.
You can delete this game object from the scene since we have a prefab now.
Change to top view in the scene viewport. To start the blocking out we need to import the layout into the scene as reference. To do this,
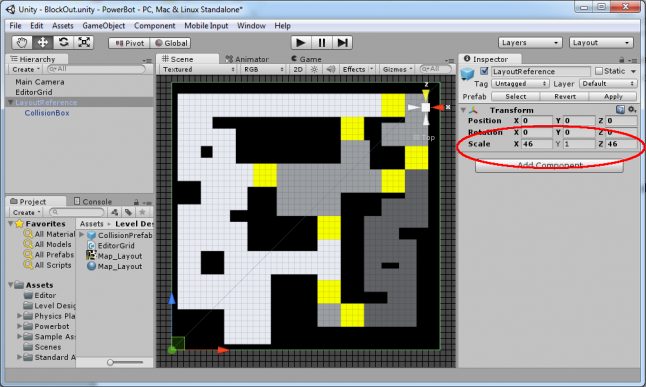
Drag the CollisionPrefab into the scene to create a game object out of it. Set its position to 0. Rename it to LayoutReference.
In Photoshop, count the number of grid cells on both the axis occupied by the layout image. In the example above the layout is 46x46 grid cell area.
Scale the LayoutReference gameobject by changing the X and Z scale values. In our example it will be 46 for both. Notice that the object scales from one end instead of scaling it from the center. This is important since now we do not have to realign the object with the grid. It will always stay on the grid
Now drag the layout image onto this object to apply it. If you check it with the image in Photoshop you will see that it matches with the grid in Photoshop. You should get something similar,
Now we are ready to start the blocking phase. To do this,
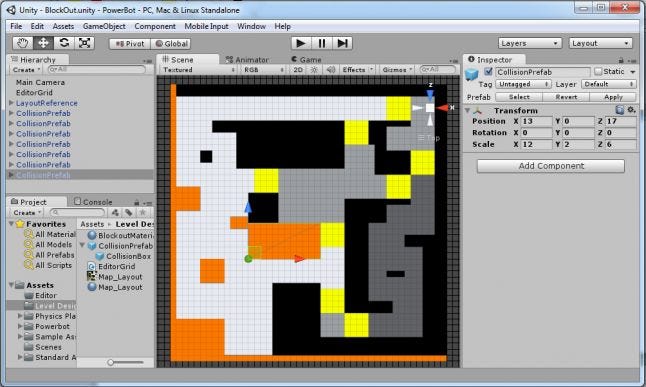
Create a new instance of the CollisionPrefab by dragging the prefab on the scene.
Reset the position to 0 on X and Z axis. Change the y value of the position transform to 2(this varies from game to game. In our game the character height was 1 meter. So the wall is 2 meters).
Now just count the grid cells each area is occupying by referring the LayoutReference we created in step 2.
Enter these values in the x and z position transform.
Duplicate it, move it to the next area and resize it in x and z axis. Press down the Ctrl key while moving the object to stay on the grid. This will allow position snapping.
For upper floors the y position needs to be changed.
To create the stairs, the gameobject needs to be rotated. The rotation angle depends on the game. For us it was 27 or less on either x or z axis.
Once the blockout is done it can be playtested and if any changes are required it can be done easily.
Although this is not the best solution for greyboxing, it is the easiest way of doing it without using any third party plugins. There are some great assets on the unity asset stores which does this. ProBuilder is a good tool for this and it has some advanced features like modifying the shape using vertices, adding textures to faces etc. One issue I have with this or any tool on the asset store is that it does not generate box collider. It generates mesh collider which is CPU heavy for mobile devices. Box colliders are fast and desirable if you are developing for a mobile platform.
If anyone has a better solution then I would be glad to try it out. We as level designers need tools for faster iteration time in this early process of level designing.
UPDATE: Reflecting what Gabriel, maker of ProBuilder, said about using box colliders, the above workflow becomes easier using the extrude method instead of unity's scaling.
Read more about:
Featured BlogsYou May Also Like