Trending
Opinion: How will Project 2025 impact game developers?
The Heritage Foundation's manifesto for the possible next administration could do great harm to many, including large portions of the game development community.

Featured Blog | This community-written post highlights the best of what the game industry has to offer. Read more like it on the Game Developer Blogs or learn how to Submit Your Own Blog Post
An in-depth examination of the enemies present in Legend of Zelda: A Link to the Past.

Welcome back to my critical breakdown of Link to the Past! In My Last Post I discussed the first combat encounter in the game with a critical eye on the enemy and level design. This time we're going to zoom out a bit and talk about enemy design at large. And by "at large" I mean we're going to examine every single enemy present in the game. Before we start, I need to clarify a few key points.
First, "enemy" is going to be defined as any entity that the player interacts with by damaging. In other words, anything that the player can attack and see the flashing damage animation is defined as an enemy. Environment objects, such as bushes, that the player can "chop down" with the sword do not play a damage animation, and so do not count. Things like Antifaeries or the Chain Chomps will not be discussed in this article, because the player can never deal damage to them, and so they act more as environmental traps in the dungeons (yes, you can "kill" antifaeries with the magic powder, I realize).
Another point of clarity is that I recorded this information entirely through observation while playing the game. I did not have any method by which I could harvest information from the code, I simply counted interactions. Times listed in the images below are approximate. Health and Damage are based on what I could observe. As such, anything after I unlocked the Master Sword, Tempered Sword, or Golden Sword will likely have less accurate health information. Damage information will be similarly error-laden after I unlocked the blue and red tunics.
Through play, I based damage on the original sword attack. A sword hit counts as 1, so an enemy with HP of 2 will die after 2 sword attacks with Sword 1. I discovered that the Boomerang deals 1/2 damage (to enemies that take damage from it), and the bow deals 2 damage, so these items were also sometimes used, though less consistently because their damage varies based on the enemy. Fire/Ice attacks seemed to deal a wide range of damage to different enemies, so anything that only takes fire/ice damage is listed below with hp reflecting the number of fire/ice attacks required to kill it. Sword 1 deals 1 damage, as noted previously. Sword 2 deals 2 damage. Sword 3 deals 3 damage. Sword 4, however, seems to deal double damage, meaning that it does 6. It's somewhat difficult to gauge this information accurately, however, as there are so few enemies in the game with >7 health. I will denote below when I got the various sword upgrades. Also of note, all 3 swords with ranged attacks at full health deal 1 damage via that ranged attack.
It is useful to denote that the enemy damage listed in this article focuses on the primary attack of the enemy. So an Archer's damage is based on the damage dealt by the arrow it fires. That being said, most enemies who have a ranged attack, appear to deal the same damage when touching the player. Exceptions to this rule can be found in enemies who fire bombs, as bombs will always deal a set damage, while the enemy might do more damage upon physical contact.
The enemies are listed in order of encounter in this article. That means that I recorded an enemy's information the first time I encountered that enemy. This may not be the order that you encounter enemies as I did things naturally throughout my playthrough. For instance, the Zora appears much later than it should, as I forgot to get the flippers until I was at Dungeon 2 in the Dark World, where they are required. I also did Dungeons 3 and 4 in reverse order, as is commonly suggested among fans of the game.
It is also possible that I missed a few enemies in the game that do, indeed, count for my rule of playing a damage animation. If I've missed something you feel needs to be listed, please do let me know and I'll adjust my information.
and with all of that out of the way, let's get started!

The introductory soldiers have knives instead of
swords, and linear vision ranges instead of cones.

Green, Blue, and Red Soldiers all exhibit the same behavior.
Even though the Red Trident Soldier appears to have a different weapon,
it is functionally the same as the sword, and so I do not list them separately.


As with the Soldiers, Archers appear in multiple colors,
but the enemies are functionally identical and so are only listed once.


There are Yellow Stalfos as well, appearing in Dungeon 1
which are functionally identical to these grey Stalfos


There is also a Red Tektite, but I noticed no difference
in its behavior or stats


Mini Baris do not appear to be susceptible to
ranged attacks while electrified.


There are multiple colors of Zol, but all are
functionally identical to each other.


The times on the Zazak patterns are particularly
inaccurate due to their rapid movement.
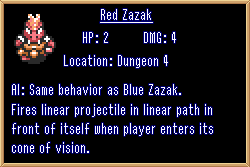

The large, invulnerable blob prevents damage
to the small blob while their hit boxes are overlapping.


Takes one fire attack to kill,
and so is listed with 1 hp.


Takes one bomb attack to kill,
and so is listed with 1 hp.


There are a special set of Wizrobes in a room of Dungeon 7
that teleport around the player, and will relocate every time they respawn.


I list this enemy with 1 health, but it is impossible
to deal that little damage at this point in the game
(little guy is either immune to range or I kept missing).
I have no idea how much health this has, but it's very little.

HP calculated based on 1hp per fire/ice rod attack.


I'm not even going to try to calculate Ganon's health as I'm not sure how much damage Silver Arrows deal, and I strongly feel like this boss calculates number of hits rather than damage dealt.
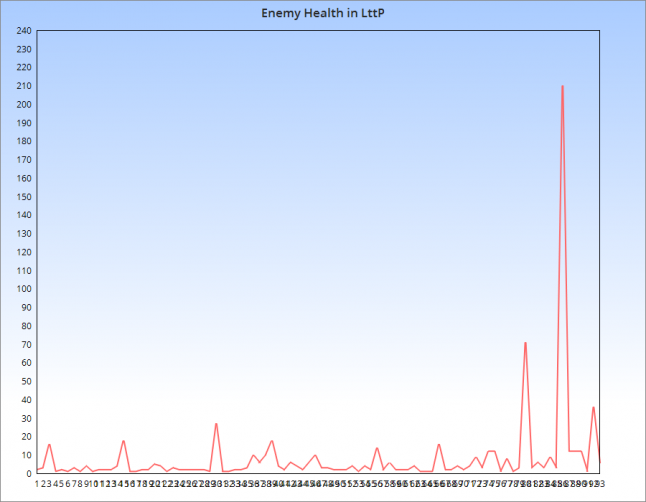
So what can we learn from all of this information? Well, quite a lot, really. For starters, let's just chart the raw data. Rather than present enemies on the chart by name, I'm just listing them in the order I presented the images above. Dungeons will be given similar treatment, graphing them in numerical order, rather than by name.
Thanks to ChartGo for their helpful website.
This is a chart of the total health of enemies, including bosses, in the game based on my collected data. You'll notice a definite ramp as the game progresses.
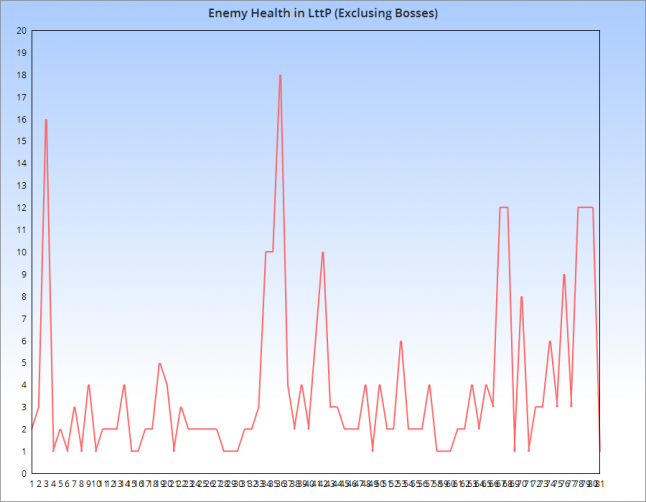
Because the bosses are such outliers, let's take them out. The resulting graph still shows a definite curve from left to right, but the ball and chain troopers spike the chart most notably, and make the curve much less pronounced. Apparently Nintendo has no issue throwing huge tanks at the player in Link to the Past, regardless of their progress in the game.
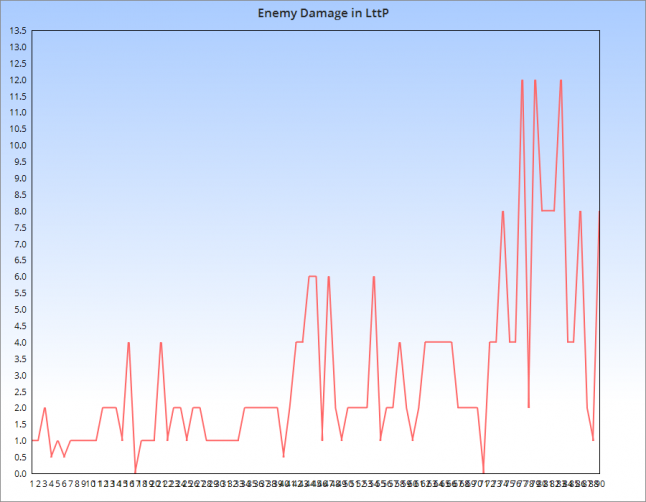
Enemy damage seems to remain fairly consistent throughout the game, spiking at two notable points. the first spike is halfway through the graph, when you get to the Dark World and are immediately confronted by the heaviest hitters in the new region. Another spike happens after dungeon 6, when you get the blue tunic.
Below, we see the number of new enemies introduced per dungeon. It seems that dungeons alternate between large and small numbers of new enemies the player must deal with, and that overall new enemy appearances decrease throughout the game. One thing to note here is the special relationship between Dungeons 3 and 4, as I completed them backwards. This is a commonly recommended method for beating these two dungeons, so let's look at the information with both orders presented. First with the order I chose, dungeon 4 before dungeon 3:
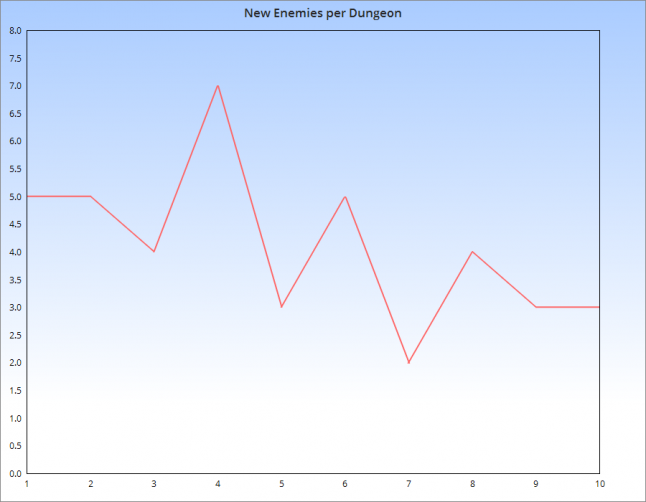
And the version with those two put into proper order:
.png/?width=646&auto=webp&quality=80&disable=upscale)
And I believe I've exhausted the raw data that can be harvested here. Enemy AI patterns doesn't rest on a graph very well, so I'll leave you to examine that information and draw conclusions as you see fit.
If you have any questions about my methods, feel free to ask in the comments below. If you find I missed an enemy somewhere (that qualifies for my definition of an enemy), or if I've made a mistake somewhere, do let me know and I'll add that information to this post.
Thanks for reading!
Read more about:
Featured BlogsYou May Also Like