Trending
Opinion: How will Project 2025 impact game developers?
The Heritage Foundation's manifesto for the possible next administration could do great harm to many, including large portions of the game development community.

Featured Blog | This community-written post highlights the best of what the game industry has to offer. Read more like it on the Game Developer Blogs or learn how to Submit Your Own Blog Post
In this post I will explain how we created a system that our designers could use to quickly create a wide variety of missions for The Man From U.N.C.L.E. game.

Originally posted on the Sticky Studios Blog.

When we started working on The Man From U.N.C.L.E., our main task was to create a large, open seamless world offering a high degree of freedom. The environment, resembling Berlin in 1963, allows players to explore, find new weapons and outfits, complete several missions, run, sneak, drive and interact with other players in real-time.
With the main platforms being IOS and Android, we obviously had to be smart about how we would construct the city. The environment needed to be big enough to stay interesting for exploration, but we also didn’t want to player to aimlessly wander around for longer periods of time. What also fed design choices were time and team size constraints. The entire game was developed in just 5 months with the Unity3D Game Engine.
One of the challenges we had to tackle were the missions. Throughout the city you can find various missions that are different each time you play it. So how were we able to create such a large amount of missions?
A mission is set up using the following 2 major components:
A mission blueprint.
A mission area.
All systems rely on these 2 components and the information they provide to define what a mission is.
Blueprints
At the very base of our mission system, we have 4 different types of missions:
Delivery. Pick up a specified object and deliver it to the designated location.
Elimination. Eliminate the designated target.
Last man standing. Eliminate your opposing agent.
Prevention. Prevent your target from reaching their designated location.
These base mission types we constructed through what we called Blueprints. These blueprints are made with ScriptableObjects, which are classes that allows storing large quantities of data that can be referenced independently by other scripts while only allocating memory once. Considering that we are storing plenty of data in these blueprints that define our missions, ScriptableObjects are the perfect solution for storing that data.
These blueprints contain various bits of information:

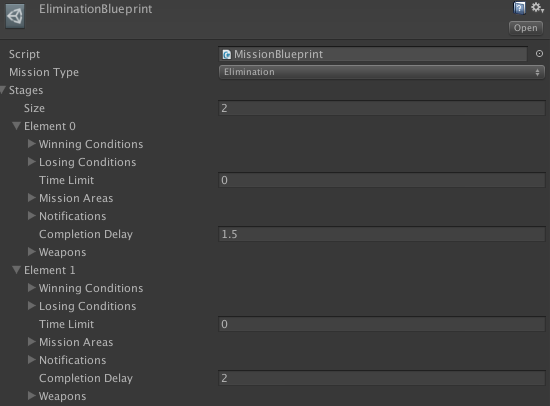
In the screenshot above you can see the blueprint structure for the Elimination mission. I’ll go over the most important components in there.
Every mission can be made up of 1 or more stages. Once you meet the winning condition of the first stage, you can continue to the next and so on. So the first components we need to set up are the winning and losing conditions. These are all generic conditions that rely on the players interaction with the world.

There are no specifically made winning or losing conditions. The underlying systems only need to know if a condition is met or not and know what your main target is.
The designers can mix and match any of these conditions to make any mission they want. We support variations relying on “Complete this condition AND that condition”, but also “Complete this condition OR that condition” and any combinations between these OR/AND operators.
Optionally, we’re able to add a certain amount of time to the missions. This amount ties in with the “OutOfTimeCondition” you can see in the list above. It can both be used for a winning or losing condition (Win by surviving for X amount of time or Kill your target within X amount of time, or lose).
The next component is another huge factor making up our missions:
Mission Areas
In short, mission areas indicate a place in the city where a mission can take place. These areas are essentially a layout of where we can spawn entities (e.g enemies) according to certain parameters. Every area consists of 1 or more different layouts, which are used for simple random variation. Within these layouts are nodes that can spawn enemies or items. Nodes can be connected to create a route on which the enemy can ‘patrol’.

(Above: example layout. In a practical situation there are multiple variations within the same area).
Game designers also define which areas are considered ‘hostile’. In non-hostile zones, players are only attacked when they exhibit suspicious behavior, for example using a weapon in plain sight, or driving recklessly. However, when players enter a ‘hostile zone’, enemies respond to sound by checking the source of the noise or engaging in an attack once they spot you.
Player gain experience points by completing missions successfully, allowing to ‘level up’. For each level gained the user can spent points in making your character perform better in certain areas, such as accuracy, sneak/cover capabilities, and so forth. As the player advances, we introduce more advanced A.I behavior and increasingly challenging missions to keep the player incentivized.
Thanks to a robust mission system, we were able to create dozens of missions - more than plenty to create an awesome experience promoting The Man From U.N.C.L.E.!
Android: http://bit.ly/1RkTi2E
Read more about:
Featured BlogsYou May Also Like