Trending
Opinion: How will Project 2025 impact game developers?
The Heritage Foundation's manifesto for the possible next administration could do great harm to many, including large portions of the game development community.
Unity's HDRP can create some beautiful projects, but in cases where you need to incorporate world-space UI elements, things don't look how you would expect. It was a challenge to find information about this online, but the fixes are actually pretty easy!

If you have decided to jump into using Unity’s oft-touted High Definition Render Pipeline (HDRP) for your next project, there are a lot of gotchas you probably won’t uncover until you are well on your way. I was stung the hardest by the HDRP’s inability to play nice with Unity’s UI in world-space—at least before I did a few simple things.
The Problem
You’re working away on getting your beautiful scenes looking just so, and then you start to add in a few in-world UI elements*. Once you plop in a few canvases, images, and text like you’ve always done in the past, you notice a few problems.
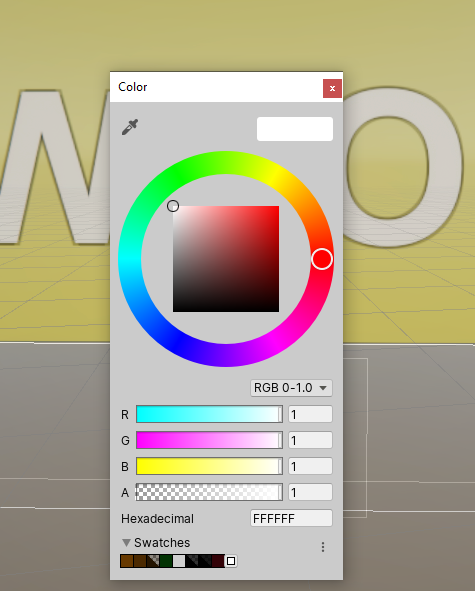
First off, colors aren’t represented accurately. The nice, popping white text you might want appears a bit washed out and dull. Take a look at the screen grab below. You can see how the selected white text color (with full alpha) looks dingy compared to the color picker swatch. This won’t do!

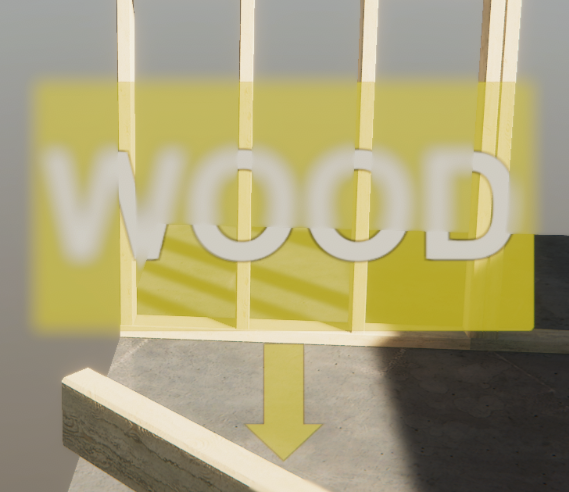
Another big deal-breaker comes along when you start applying post-processing effects. In the screen grab below, you can see that applying a depth of field effect just destroys the readability of the entire UI, and it’s basically a mess.

Neither issue is acceptable, especially since you’re obviously looking for a polished look in your HDRP project. Luckily, the fixes are pretty easy to implement.
The Fix
It took a bit to find the correct way to correct these issues, mainly because there seems to be very little written about how the UI elements’ shaders operate. Let’s step through the two shaders I created to get things working right. Both of these shaders are created by using an Unlit Graph under the HDRP shader menu (Create -> Shader -> HDRP -> Unlit Graph).
The more basic shader we will create is for Image elements, which will impact everything from sprites to backgrounds to buttons in your UI.
![]()
The only property you will have to add to this shader is a Texture 2D. It must be given the Reference name “_MainTex” as this is what the Image element will be looking for. We tie our _MainTex property into a Sample Texture 2D node and multiply that by the output of a Vertex Color node. The Vertex Color node is pulling the “Color” property from the Image element. We split out the alpha channels of both the Vertex Color and Sample Texture 2D to feed into the alpha channel of the Unlit Master node.
If we apply a material with this shader to an Image element in our world-space UI, those color problems we were having disappear, and this setup allows us to interact with the UI elements in the standard ways, whether we are using scripts or the animator. There’s still another issue, though, and that’s the post-processing effects.
This is a simple thing to change in Shader Graph, and it will probably come up often in your HDRP project. Since we want the UI to be overlaid atop any post-processing and keep the UI clear, we just have to change the Rendering Pass setting on the Unlit Master node, as shown below. Once it is set to render “After Post-process,” everything should appear as expected.
![]()
The other shader we need is for Text elements, which works similarly to the Image’s shader, but there are a few key changes.

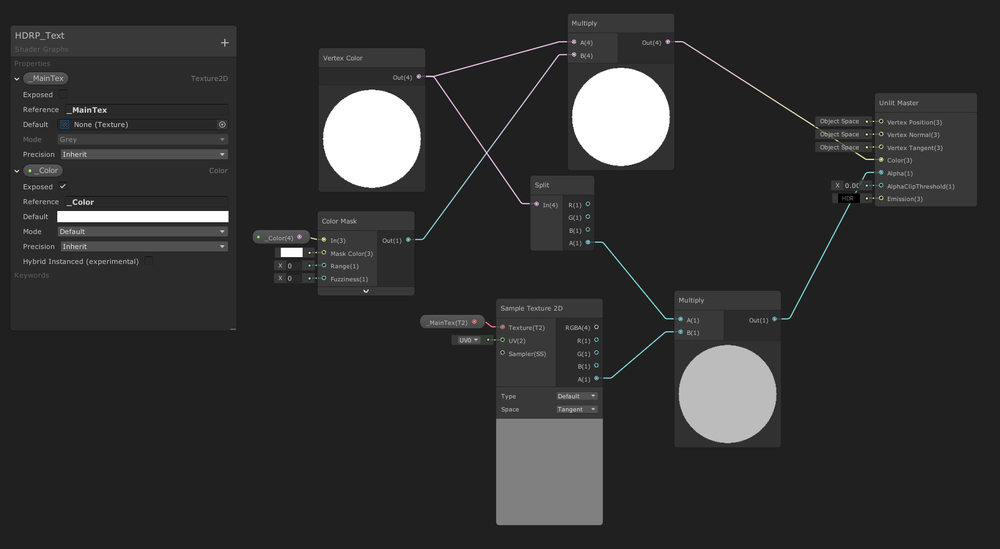
We must incorporate a Color Mask node to pull the masking information from the Text element. Feeding into this Color Mask node is a Color property that must have a Reference name of “_Color” to ensure that the Text element sends the masking information to the correct property. The “Mask Color” input on the Color Mask node should be set to white in order for the _Color property to be applied as expected. The Color Mask output is multiplied by a Vertex Color node, which is pulling the “Color” property from the Text element (which is different from the “_Color” property we are pulling in for our Color Mask).
Another “_MainTex” property is needed and fed into a Sample Texture 2D node. This is strictly used for its alpha property to get the shape of the text, as typed in the editor. These color and alpha results feed into the Unlit Master node, and everything should be working fine. Just set that “Rendering Pass” property correctly here as well.
Do note that the “_Color” property used for the mask needs to remain exposed even though we don’t want to change it directly. There may be a good explanation for this, but it seems like a quirk of Shader Graph to me.
The Results
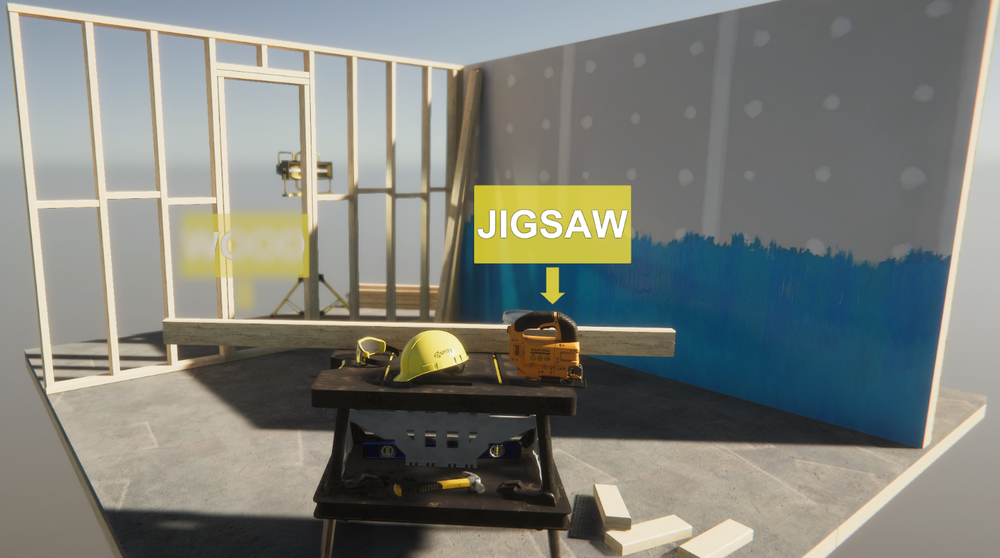
Plug materials made from these shaders into the appropriate UI elements in your project, and everything should work as expected. In the construction site demo scene, you can clearly see the difference between the UI that reads “WOOD” without the materials applied and the UI that reads “JIGSAW” that does have the materials applied.

Now that you have these basic shaders set up, you can also modify them to add other effects you might want to incorporate into your UI. To help out, I’ve set up a repository with this sample project and a package containing the two needed materials and their shaders here.
Note that this solution is only intended for HDRP projects, and not those using URP. From a brief bit of research, it seems like world-space UI behaves a bit better in URP, but will still have issues with incorporating post-processing effects. Since URP is trying to operate as efficiently as possible, it doesn’t have the Render Pass option in the master node to alleviate this issue. If you’ve figured out a workaround for this situation, please leave a comment and let us know!
I hope this helps saves someone a few hours of hunting around online and fiddling with Shader Graph to get their UI working with HDRP. It was a relief for me to get over this hump and start implementing actual UI functionality with the same methods I was accustomed to.
*Note: This blog often refers to "UI elements," meaning components within the "Unity UI" system (sometimes called "uGUI"). This solution does not apply to the up-and-coming "UIElements" system that started a slow rollout in Unity 2019.1.
Read more about:
BlogsYou May Also Like