Trending
Opinion: How will Project 2025 impact game developers?
The Heritage Foundation's manifesto for the possible next administration could do great harm to many, including large portions of the game development community.

Featured Blog | This community-written post highlights the best of what the game industry has to offer. Read more like it on the Game Developer Blogs or learn how to Submit Your Own Blog Post
An introduction to procedural geometry. Part 1A: The plane. Procedural geometry is geometry modelled in code. Instead of building 3D meshes by hand using art software such as Maya, 3DS Max or Blender, the mesh is built using programmed instructions.


Procedural geometry is geometry modelled in code. Instead of building 3D meshes by hand using art software such as Maya, 3DS Max or Blender, the mesh is built using programmed instructions.
This can be done at runtime (the mesh does not exist until the end-user runs the program), at edit time (using script or tool when the application is being developed), or inside a 3D art package (using a scripting language such as MEL or MaxScript).
Benefits of generating meshes procedurally include:
Variation: Meshes can be built with random variations, meaning you can avoid repeating geometry.
Scalability: Meshes can be generated with more or less detail depending on the end-user’s machine or preferences.
Control: Game/level designers with little knowledge of 3D modelling software can have more control over the appearance of a level.
Speed: Many variants of an object can be generated easily and quickly.
Some background on me: I’m a 3D-artist-turned-games-programmer-turned-solo-developer who thinks that taking an object and figuring out how to make it with a script is fun. Not an idea of fun that everyone shares, but that’s OK.
Here are some procedural examples from my own game projects:

The procedural parts of a level from Stranger’s Call (highest and lowest detail settings) (these are based on a randomly generated layout, so the same level never appears twice).

Plants from Ludus silva (these are created/edited in-game by the player).
I’ve had a few people look at images like these and want to know how it’s done. Well, it’s done by taking some basic shapes and then adding complications to them. Most of the procedural stuff I do can be reduced to two basic shapes: The plane and the cylinder.
So we’re going to learn how to make those.
For all examples, I’ll be using C# and Unity. All the important concepts should be transferable to the language/engine of your choice.
The ability to understand basic C# is going to be necessary, and some knowledge of 3D geometry will be helpful.
A handy quiz for those who are uncertain:
Do you know what classes, functions, arrays and for loops are?
If I write them in C# will you recognise them?
Do you understand what a 3D vector is? (Vector3 struct in Unity)
Do you know how to get the direction from one point to another?
How did you do? Passed? Excellent. Read On.
Didn’t do so well? You might want to check out the official Unity scripting tutorials, or Google “Basic C# tutorial” and look at any of the umpteen million results (C# Station is a decent one).
Most people with a 3D art background or at least a basic knowledge of 3D art will be able to skip this preface. For anyone with little experience using 3D assets, here is a brief explanation of what such an asset involves.
What we will be constructing in the following tutorial is known as a polygon mesh. It can be defined as a series of points (vertices) in 3D space, as well as a series of triangles, where each triangle forms the surface between 3 vertices. Triangles may or may not share vertices.

Two 3D meshes. Lit (left) and wireframe, showing the triangle structure (right).
There’s a little bit of common terminology that should be clarified before we go much further. You’ve probably heard terms like “poly-count” or “high-poly”/”low-poly” before. In these cases, “polygons” usually refer to triangles, but it’s good to clarify with whoever is using these terms, if you can. Most 3D modelling software allows artists to work with polygons with any number of sides. A poly-count produced by that software may be counting those shapes instead. When it comes to render time, however, those shapes will have to be broken down into triangles because that’s what the graphics hardware understands. Triangles are all that Unity’s Mesh class understands, as well. So we will be working with triangles all the way.
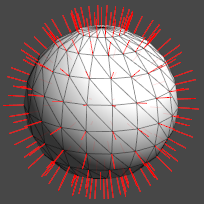
We’ll be adding some additional data to our meshes, besides triangles and 3D positions. Like normals. These are the outward directions of the vertices. Normals are required in order to apply lighting to a mesh.
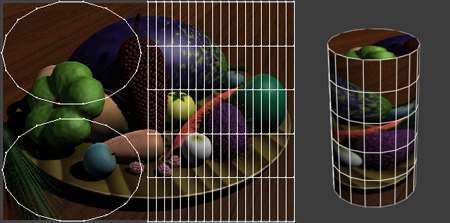
The other thing we’re going to be adding is UV coordinates (or just UVs). These are necessary for applying a texture to a mesh. A UV coordinate is a position in 2D (UV) space. The pixels of a texture at that coordinate are then applied to the mesh at that position. The UVs of a mesh are often referred to as its “unwrap”, because they can be thought of as the surface of the mesh being peeled away and flattened onto the texture space.
That’s the basic explanation of what a mesh is. Now let’s learn to make some.
This tutorial is quite long, so I’ll divide it into parts:

The first of the basic building blocks: the plane and, by extension, the box.

We’ll be looking at building two actual objects: a house and a fence.

The second of the two basic building blocks: the cylinder and, by extension, spheres and other round things.

More less-basic objects, a mushroom and a flower.

Unity assets - Unity package file containing scripts and scenes for this tutorial (parts 1A and 1B).
Source files - Just the source files, for those that don’t have Unity.
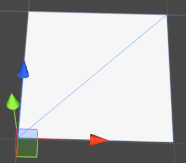

The simplest shape of them all. This is a basic flat plane, with 4 vertices and 2 triangles.
We’ll start with the components we’ll need. This mesh will have vertices, triangles, normals and UV coordinates. The only absolutely necessary parts are the vertices and triangles. If your mesh is not going to be lit in the scene, you don’t need normals. If you’re not going to be applying a texture to the material, you don’t need UVs.
Vector3[] vertices = new Vector3[4];
Vector3[] normals = new Vector3[4];
Vector2[] uv = new Vector2[4];
Now we assign some values to our vertices. This code assumes two previously defined variables: m_Width and m_Length, which are, as you might expect, the width and length of our quad.
This mesh is built in the XZ plane, with the normal pointing straight up the Y axis (good for a ground plane, which we’ll be looking at later). You can change this around as you like, eg. using the XY, pointing down the Z axis (useful for billboards).
Position values all vary from 0.0f to the length/width, which will leave [0.0, 0.0] at the corner of the mesh. The origin of a mesh is its pivot point, so this mesh will pivot from that corner. If you want, you can offset the values by half the width and length to put the pivot at the centre.
vertices[0] = new Vector3(0.0f, 0.0f, 0.0f);
uv[0] = new Vector2(0.0f, 0.0f);
normals[0] = Vector3.up;

vertices[1] = new Vector3(0.0f, 0.0f, m_Length);
uv[1] = new Vector2(0.0f, 1.0f);
normals[1] = Vector3.up;

vertices[2] = new Vector3(m_Width, 0.0f, m_Length);
uv[2] = new Vector2(1.0f, 1.0f);
normals[2] = Vector3.up;

vertices[3] = new Vector3(m_Width, 0.0f, 0.0f);
uv[3] = new Vector2(1.0f, 0.0f);
normals[3] = Vector3.up;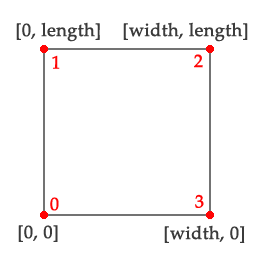
Now we build our triangles. Each triangle is defined by three integers, each one being the index of the vertex at that corner. The order of vertices inside each triangle is called the winding order, and will either be clockwise or counterclockwise, depending on which side we are looking at the triangle from. Usually, the counterclockwise side (backface) will be culled when the mesh is rendered. We want to make sure the clockwise side faces in the same direction as our normal (ie. up).
int[] indices = new int[6]; //2 triangles, 3 indices each

indices[0] = 0;
indices[1] = 1;
indices[2] = 2;

indices[3] = 0;
indices[4] = 2;
indices[5] = 3;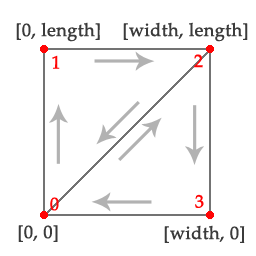
Now lets put it all together. In Unity, this simply involves assigning all the arrays we just created to an instance of the Unity Mesh class. We call RecalculateBounds() at the very end to make the mesh recalculate its extents (it needs these for render culling).
Mesh mesh = new Mesh();

mesh.vertices = vertices;
mesh.normals = normals;
mesh.uv = uv;
mesh.triangles = indices;

mesh.RecalculateBounds();
Now we have a mesh that’s done and good to go. In our Unity scene, we’ve attached this script to a GameObject containing mesh filter and mesh renderer components. The following code looks for the mesh filter and assigns the mesh we just made to it. The mesh now exists as part of an object in our scene.
MeshFilter filter = GetComponent();

if (filter != null)
{
	filter.sharedMesh = mesh;
}
You have now made your first procedural mesh.
OK, let’s assume we’re going to be doing a fair bit of this procedural stuff for here on in. Something that get tedious is writing the same mesh initialisation code (the bit at the end) over and over again, but not as tedious as the errors that happen because you’ve slightly miscalculated the number of vertices/triangles you’re going to need at the beginning. Time to wrap it all up in class of its own.
using UnityEngine;
using System.Collections;
using System.Collections.Generic;

public class MeshBuilder
{
	private List m_Vertices = new List();
	public List Vertices { get { return m_Vertices; } }

	private List m_Normals = new List();
	public List Normals { get { return m_Normals; } }

	private List m_UVs = new List();
	public List UVs { get { return m_UVs; } }

	private List m_Indices = new List();

	public void AddTriangle(int index0, int index1, int index2)
	{
		m_Indices.Add(index0);
		m_Indices.Add(index1);
		m_Indices.Add(index2);
	}

	public Mesh CreateMesh()
	{
		Mesh mesh = new Mesh();

		mesh.vertices = m_Vertices.ToArray();
		mesh.triangles = m_Indices.ToArray();

		//Normals are optional. Only use them if we have the correct amount:
		if (m_Normals.Count == m_Vertices.Count)
			mesh.normals = m_Normals.ToArray();

		//UVs are optional. Only use them if we have the correct amount:
		if (m_UVs.Count == m_Vertices.Count)
			mesh.uv = m_UVs.ToArray();

		mesh.RecalculateBounds();

		return mesh;
	}
}
All the data you’ll need is now in one class that’s easy to pass between functions. Also, because we’re using generic lists instead of arrays, there’s no miscalculating the number of vertices or triangles required. Plus it makes it easier to combine meshes: just generate them using the same MeshBuilder.
Note: This is a simplified version of the class I use in my own projects. There are things it doesn’t do, like tangents and vertex colours, or reserving space for very large meshes, or altering existing instances of the Mesh class.
Now, using this class, our quad generation code looks like this:
MeshBuilder meshBuilder = new MeshBuilder();

//Set up the vertices and triangles:
meshBuilder.Vertices.Add(new Vector3(0.0f, 0.0f, 0.0f));
meshBuilder.UVs.Add(new Vector2(0.0f, 0.0f));
meshBuilder.Normals.Add(Vector3.up);

meshBuilder.Vertices.Add(new Vector3(0.0f, 0.0f, m_Length));
meshBuilder.UVs.Add(new Vector2(0.0f, 1.0f));
meshBuilder.Normals.Add(Vector3.up);

meshBuilder.Vertices.Add(new Vector3(m_Width, 0.0f, m_Length));
meshBuilder.UVs.Add(new Vector2(1.0f, 1.0f));
meshBuilder.Normals.Add(Vector3.up);

meshBuilder.Vertices.Add(new Vector3(m_Width, 0.0f, 0.0f));
meshBuilder.UVs.Add(new Vector2(1.0f, 0.0f));
meshBuilder.Normals.Add(Vector3.up);

meshBuilder.AddTriangle(0, 1, 2);
meshBuilder.AddTriangle(0, 2, 3);

//Create the mesh:
MeshFilter filter = GetComponent();

if (filter != null)
{
	filter.sharedMesh = meshBuilder.CreateMesh();
}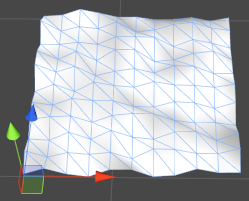

A terrain for your level. Or, really, just a bumpy plane.
Note: The “bumpiness” in this terrain is done by assigning a random height to each vertex. It’s done this way because it makes the code nice and simple, not because it makes a good looking terrain. If you’re serious about building a terrain mesh, you might try using a heightmap, or perlin noise, or looking into algorithms such as diamond-square.
This terrain can be thought of as a series of quads arranged in a grid. As a first step, we’re going to do exactly that. First, we define a function that builds a quad exactly like we did above. Only this function will take as an argument a position offset, which gets added to the vertex positions.
void BuildQuad(MeshBuilder meshBuilder, Vector3 offset)
{
	meshBuilder.Vertices.Add(new Vector3(0.0f, 0.0f, 0.0f) + offset);
	meshBuilder.UVs.Add(new Vector2(0.0f, 0.0f));
	meshBuilder.Normals.Add(Vector3.up);

	meshBuilder.Vertices.Add(new Vector3(0.0f, 0.0f, m_Length) + offset);
	meshBuilder.UVs.Add(new Vector2(0.0f, 1.0f));
	meshBuilder.Normals.Add(Vector3.up);

	meshBuilder.Vertices.Add(new Vector3(m_Width, 0.0f, m_Length) + offset);
	meshBuilder.UVs.Add(new Vector2(1.0f, 1.0f));
	meshBuilder.Normals.Add(Vector3.up);

	meshBuilder.Vertices.Add(new Vector3(m_Width, 0.0f, 0.0f) + offset);
	meshBuilder.UVs.Add(new Vector2(1.0f, 0.0f));
	meshBuilder.Normals.Add(Vector3.up);

	int baseIndex = meshBuilder.Vertices.Count - 4;

	meshBuilder.AddTriangle(baseIndex, baseIndex + 1, baseIndex + 2);
	meshBuilder.AddTriangle(baseIndex, baseIndex + 2, baseIndex + 3);
}
Note also the vertex indices for the triangles. This time, we are adding an unknown number of quads to the MeshBuilder, instead of just one. Instead of index 0, we need to start from the beginning of the vertices we just added.
Now to call the function we just wrote. Pretty simple, just a pair of loops that call BuildQuad(), increasing the X and Z values of the offset each time:
MeshBuilder meshBuilder = new MeshBuilder();

for (int i = 0; i < m_SegmentCount; i++)
{
	float z = m_Length * i;

	for (int j = 0; j < m_SegmentCount; j++)
	{
		float x = m_Width * j;

		Vector3 offset = new Vector3(x, Random.Range(0.0f, m_Height), z);

		BuildQuad(meshBuilder, offset);
	}
}
If you run this code, you’ll end up with a mesh that looks something like this:
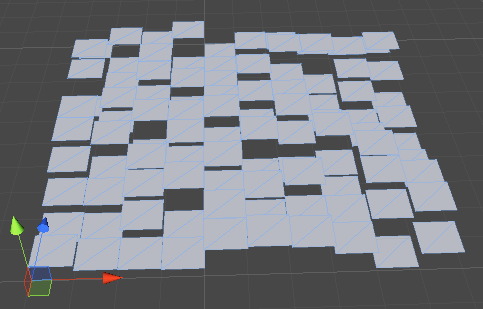
We can see the basic layout now, but the mesh isn’t much good like this. Let’s join the whole thing up into one. To do this, we need adjacent quads to share their vertices instead of making four new ones each. In fact, we only need to create one vertex for each section. The quad can then use this, and the vertices from the previous row and column. The new function looks like this:
void BuildQuadForGrid(MeshBuilder meshBuilder, Vector3 position, Vector2 uv,
	bool buildTriangles, int vertsPerRow)
{
	meshBuilder.Vertices.Add(position);
	meshBuilder.UVs.Add(uv);

	if (buildTriangles)
	{
		int baseIndex = meshBuilder.Vertices.Count - 1;

		int index0 = baseIndex;
		int index1 = baseIndex - 1;
		int index2 = baseIndex - vertsPerRow;
		int index3 = baseIndex - vertsPerRow - 1;

		meshBuilder.AddTriangle(index0, index2, index1);
		meshBuilder.AddTriangle(index2, index3, index1);
	}
}
You’ll notice many differences between this and the previous version. We’re using the position offset as the vertex position, since this will be incremented anyway. Also the UV coordinates are being passed in from the external code, to avoid them being the same for every vertex in the mesh. You will also notice that no normal is being defined - we’ll get to that later.
The most interesting bit is the triangles. They aren’t being built every time. This is because each quad uses vertices from the previous row and column. If this is the first vertex in any row or column, there will be no previous vertices to build a quad with.
The indices also differ. We start from the last vertex index and work backward from there. The previous index is the vertex from the previous column. Vertices from the previous row need to subtract the number of vertices in a row from the index.
In my experience, calculation of triangle indices is the pickiest part of procedural mesh generation. Always go and check your indices whenever mesh algorithms change.
Let’s revisit the code the calls this function:
for (int i = 0; i <= m_SegmentCount; i++)
{
	float z = m_Length * i;
	float v = (1.0f / m_SegmentCount) * i;

	for (int j = 0; j <= m_SegmentCount; j++)
	{
		float x = m_Width * j;
		float u = (1.0f / m_SegmentCount) * j;

		Vector3 offset = new Vector3(x, Random.Range(0.0f, m_Height), z);

		Vector2 uv = new Vector2(u, v);
		bool buildTriangles = i > 0 && j > 0;

		BuildQuadForGrid(meshBuilder, offset, uv, buildTriangles, m_StepCount + 1);
	}
}
Notice we’re calculating UVs alongside the position offset. Also notice the check for i and j being greater than zero. This is how we stop the first vertex in each row or column from building triangles.
One other (and subtler) difference. The i and j loops now use <= instead of < in their end condition. Because the first vertices don’t generate triangles, our ground plane is now one segment smaller in each direction. We let the loops run one extra time to compensate.
Last but not least, remember those normals we didn’t calculate? The normal for each vertex in a mesh like this depends on the vertex position relative to the surrounding vertices. Because we have some randomness in each vertex position, normals can’t be calculated until after all the vertices have been generated.
Actually, we’re going to cheat. Unity provides a function to do the normals calculation for us.
Mesh mesh = meshBuilder.CreateMesh();
mesh.RecalculateNormals();
Note that Mesh.RecalculateNormals() isn’t always the best solution and can come up with odd-looking results, particularly if the mesh has seams. I’ll talk more about this later. For our noisy plane, however, it does the job just fine.
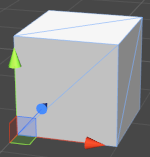

A box isn’t much more complicated than a quad. In fact, it’s just six quads.
To make one, though, we’ll need a BuildQuad() function that lets us tell it which direction we want the quad to face.
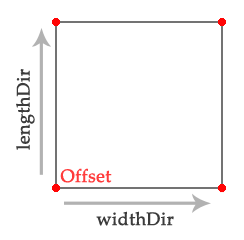
void BuildQuad(MeshBuilder meshBuilder, Vector3 offset,
	Vector3 widthDir, Vector3 lengthDir)
{
	Vector3 normal = Vector3.Cross(lengthDir, widthDir).normalized;

	meshBuilder.Vertices.Add(offset);
	meshBuilder.UVs.Add(new Vector2(0.0f, 0.0f));
	meshBuilder.Normals.Add(normal);

	meshBuilder.Vertices.Add(offset + lengthDir);
	meshBuilder.UVs.Add(new Vector2(0.0f, 1.0f));
	meshBuilder.Normals.Add(normal);

	meshBuilder.Vertices.Add(offset + lengthDir + widthDir);
	meshBuilder.UVs.Add(new Vector2(1.0f, 1.0f));
	meshBuilder.Normals.Add(normal);

	meshBuilder.Vertices.Add(offset + widthDir);
	meshBuilder.UVs.Add(new Vector2(1.0f, 0.0f));
	meshBuilder.Normals.Add(normal);

	int baseIndex = meshBuilder.Vertices.Count - 4;

	meshBuilder.AddTriangle(baseIndex, baseIndex + 1, baseIndex + 2);
	meshBuilder.AddTriangle(baseIndex, baseIndex + 2, baseIndex + 3);
}
This looks very much like the BuildQuad() we used above, except here we use directional vectors and add them to the offset, instead of plugging values directly into the X and Z positions.
The normal can also be calculated easily here. It is merely the cross product of the two directions (make sure you normalise it).
Note: Alternatively, you could write a BuildQuad() function that directly takes the position of each of the four corners and uses those. For really complicated meshes, that may be necessary but, for our purposes, the directional code is much less messy.
Now to call our new function:
MeshBuilder meshBuilder = new MeshBuilder();

Vector3 upDir = Vector3.up * m_Height;
Vector3 rightDir = Vector3.right * m_Width;
Vector3 forwardDir = Vector3.forward * m_Length;

Vector3 nearCorner = Vector3.zero;
Vector3 farCorner = upDir + rightDir + forwardDir;

BuildQuad(meshBuilder, nearCorner, forwardDir, rightDir);
BuildQuad(meshBuilder, nearCorner, rightDir, upDir);
BuildQuad(meshBuilder, nearCorner, upDir, forwardDir);

BuildQuad(meshBuilder, farCorner, -rightDir, -forwardDir);
BuildQuad(meshBuilder, farCorner, -upDir, -rightDir);
BuildQuad(meshBuilder, farCorner, -forwardDir, -upDir);

Mesh mesh = meshBuilder.CreateMesh();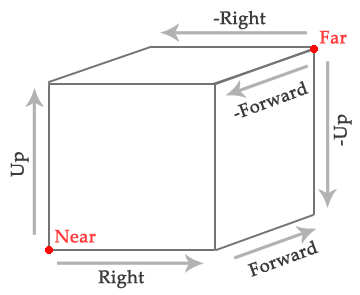
Here, all of the planes originate from two corners opposite each other in the box. Note that the near corner is the origin, meaning that the mesh will pivot from this corner. To pivot from the centre, simply divide farCorner by two and have nearCorner be the negative of that value:
Vector3 farCorner = (upDir + rightDir + forwardDir) / 2;
Vector3 nearCorner = -farCorner;
Observant readers will have noticed that every quad has its own 4 vertices, leaving the entire box with 24 vertices in total. Surely it’s more efficient to just have 8, one at each corner, and get all the triangles to share them, the same as the ground mesh?
Actually, the answer is no. We need all 24 of those vertices. This is because even though the vertex positions are the same at each corner, the normals (and the UVs, for that matter) are not. If the normals were shared, we’d get very bad looking lighting indeed:
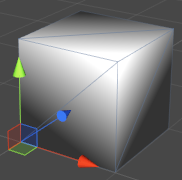
By separating the vertices for each quad, we create a seam along the edges, allowing separate normals on each side:

Note: That said, if for some reason your mesh is using neither normals or UVs, feel free to rewrite the code to share the vertices - this goes for any shape. The performance saving is only likely to be noticeable if you’re rendering hundreds of the things, or are making very high-poly meshes, but you know your project better than I do.
Have fun with your box. In the next part of this tutorial, we’ll look at ways to extend the basic shapes we’ve learned to make some more interesting meshes.
On to part 1B: Making planes interesting

Read more about:
Featured BlogsYou May Also Like