Trending
Opinion: How will Project 2025 impact game developers?
The Heritage Foundation's manifesto for the possible next administration could do great harm to many, including large portions of the game development community.

Featured Blog | This community-written post highlights the best of what the game industry has to offer. Read more like it on the Game Developer Blogs or learn how to Submit Your Own Blog Post
A few people have asked me how I get the art in Catlateral Damage to look the way it does, so I wanted to give an overview of my workflow using Blender and Unity.

This is a post I've been meaning to write for a while! A few people have asked me how I get the art in Catlateral Damage to look the way it does, so I wanted to give an overview of my workflow using Blender and Unity. Hopefully this will be helpful to other developers who are interested in using this type of style for their games.
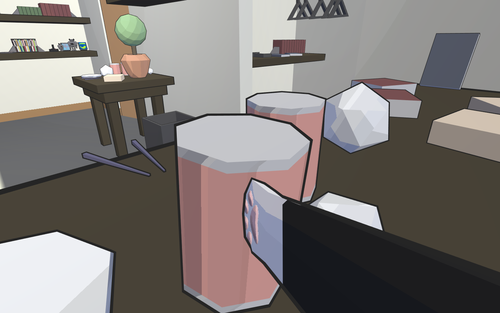
The art style in Catlateral Damage is cartoony and fairly minimalistic. The visuals, as well as the gameplay, definitely draw inspiration from Katamari Damacy. I wanted a style that fit the silly gameplay and was easy for me to create/work with quickly. The result is a semi-pastel color scheme with black outlines and a simple shading ramp. I feel like this style is appealing to a wide audience given its simplicity and it emphasizes the craziness of the gameplay. Sometimes I like to think this is how cats actually see things in real life: a little desaturated, vague but detailed enough to know what things are.
Creating Object Meshes
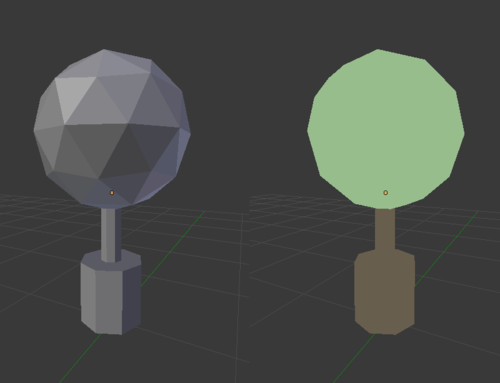
Creating the 3D models for all objects starts in Blender. I like using Blender because I can perform different tasks, like basic modeling and creating UV's, faster than with other tools I've used (like Autodesk Maya). It's also free, which is always a plus for indie developers. The interface was a bit tricky to learn, but hotkeys make sense (e.g. G for grab, R to rotate, and S to scale instead of W, E, and R in most other tools) and pressing Space brings up a search bar for finding specific commands (quicker than digging through menus and helpful when forgetting exact commands/hotkeys). Since all the art in the game is low-poly, I can crank out objects, give them color, and have them ready in Unity in no time. I actually have all objects in one Blender .blend file that is imported into Unity (rather than several individual files). I don't know if this is bad practice, but it's neater than organizing tons of individual files.
Adding Color (UV's and Texturing)
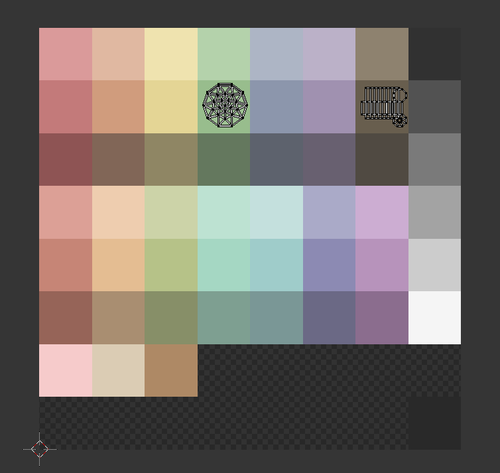
The way I texture objects might be a bit unconventional, but it seems to work well for this game. It may come as a surprise, but all objects in the game (physics objects and furniture objects) use one shared texture! The texture acts as sort of an atlas or color palette for objects, and UVs are laid out inside the colored boxes to give object faces their color. The advantages of this method are that all objects have a consistent palette, UV's are done quickly and don't have to be pretty (they actually end up looking pretty gross), there aren't any jarring seams, and performance (draw calls) are super low in Unity. The only real disadvantage is that more detailed objects are more complicated to put together. Since the texture is just colors, each part of a detailed object needs to have separate, extra polygons for each color on the object. Adding unnecessary polygons is usually a bad idea in games, but so far it seems negligible given the low-poly nature of the game. Right now, the color palette itself needs a bit of tweaking, but the texturing method works well.
Making the Outlines
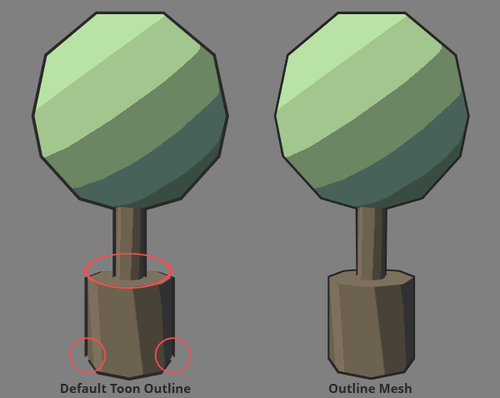
Creating outlines is incredibly simple. I started using Unity's default Toon shader with outlines but there were a few issues with it. The default outline shader takes the individual faces of objects, extrudes them along their normals, flips them inside-out, and colors them. For most games this works and looks alright, but since the art in this game is low-poly, the gaps between outline faces are quite visible. When the default outline shader is applied to all objects the result is pretty gross, especially on lower quality settings. To solve this, I'm using a technique I first saw on this blog post by Jeff Hung. In Blender, I create a second mesh for every object which is a slightly extruded version of the base model with inverted normals. In Unity, this second mesh gets a basic, black texture and is added as a child to the base object. The results are much smoother outlines (even on lower settings) and no noticeable performance hit (probably because of the low number of additional polygons, as mentioned above). Creating these outlines by hand would take a significant amount of time, so I'm using a custom script in Blender that acts sort of like a Photoshop action for automatically generating the outline mesh at the push of a button. (You can get the script here! Change the "value" on the "bpy.ops.transform.shrink_fatten" line to change outline thickness.)
Putting it Together
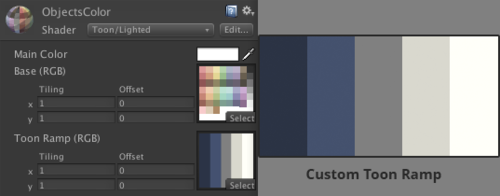
Once both the base mesh and outline mesh are created in Blender, everything can be put together in Unity! The import settings for the .blend file are pretty generic. I use a scale factor of 4 in Unity to solve some physics issues I encountered early on in development. I also have Unity calculating normals and tangents with a smoothing angle of 45. The only data I really use from the Blender file are the models and UV's; textures and shaders are applied in Unity. To create a useable object in the game, I first create a new instance of a pre-made base object prefab that contains mesh filter and mesh renderer components and a child object for the outline with the same components. Each object has a different material: the color texture for the base model and the black one for the outline. The base object's material is extremely simple: it's just Unity's default "Toon Lighted" shader with a custom toon ramp! I played around with the toon ramp to get things to look right, and I like how it's looking now.
And that's about it! Other objects, like the player's paw and the walls, use the same outline technique and material but with different textures. I've thought of a few improvements to the visuals including different lighting and shadows, but things are in a good place now. I'll be polishing up some stuff in the future, though, like the color palette as mentioned before. If you have any questions or think I missed anything, feel free to send me a message!
Read more about:
Featured BlogsYou May Also Like