Trending
Opinion: How will Project 2025 impact game developers?
The Heritage Foundation's manifesto for the possible next administration could do great harm to many, including large portions of the game development community.

Featured Blog | This community-written post highlights the best of what the game industry has to offer. Read more like it on the Game Developer Blogs or learn how to Submit Your Own Blog Post
For M.E.R.C. we relied on procedural level generation to add more content and randomness to our game. This article details how we built our procedural level system in Unity and overcame various problems to meet our design goals (part 2 of 2).

In Part 1 of this article we discussed why we chose to use procedural level generation for M.E.R.C. and laid out our requirements. We also described how we generate a procedural level's layout and connect multiple smaller level chunks together to form a fully coherent level. In part 2 of this article we discuss how we overcome lighting and NavMesh problems in Unity, and how we spawn NPCs based on a tempo.
Lighting
With our procedurally generated path, it is likely that the same chunk will be loaded multiple times for each level. The duplicate meshes within those chunks are stored in memory separately, but the lightmaps can be shared by adding code to our level loader to amalgamate all the lightmaps by scene name. Lightmap indexes are then reassigned as they load, saving memory instead of duplicating lightmaps for those chunks.
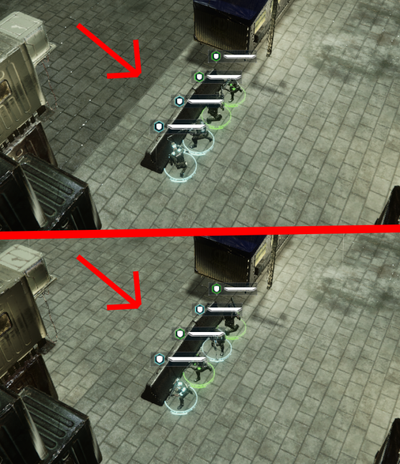
In order to ensure the level chunks line up properly with their baked lighting and shadows, we baked each scene sharing a theme with the same lighting settings. We found that using an "ambient source" setting of "skybox" resulted in lighting that was slightly different in each chunk and showed obvious seams where the chunks connected. This was clearly not ideal and we experimented with different lighting setups to find the best option. We found the best results by setting the "ambient source" to "gradient" which provided near perfect connections without visible seams. The following image shows the difference.

As we generate a procedural level for M.E.R.C., we have one "parent" scene that we load first before any chunks. This scene has a single directional light used for real-time lighting and is baked using the same lighting settings as all the chunks. This scene also contains any global objects or settings needed for the finished level. We set this parent scene as the "active" scene in Unity's scene management as we load the chunks so its settings are used for the entire scene.
NavMesh
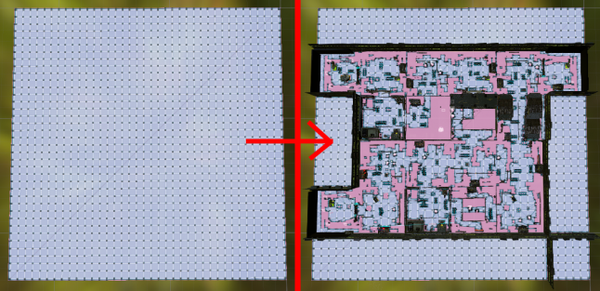
We use Unity's NavMesh system for all our mercenary and NPC pathing in M.E.R.C. When we designed this procedural system, Unity did not support stitching together multiple NavMeshes dynamically at runtime. Unity has since started adding this feature to the new beta in version 5.6, but at the time of this article it is still incomplete. So we had to solve the problem of loading multiple random level chunks and having each of them work together with a single NavMesh. Based on feedback from the Unity developers themselves, the only way we could achieve this was by having a single large NavMesh area and then cutting out of it with each level chunk. So in our parent scene we created a single large flat NavMesh covering the full playable area. Then we used Unity's “NavMeshObstacle" component and set it to carve on all of our walls and prefabs. When they are loaded and placed on the NavMesh they cut out from it, leaving our main path for movement.
This system actually works quite well and barely affects the loading time of levels. The main restriction is that we cannot have varied NavMesh elevations within our level chunks because they only cut out of the single flat NavMesh that exists in the parent scene. There is no way to know what chunk will load where beforehand, so we can't build elevation changes into the NavMesh because each level layout is random and dynamic. We intend to upgrade our system to support the stitching of multiple NavMeshes with varied elevations as we update to Unity 5.6 in the future.

After we loaded each chunk and laid out our paths, we wanted to add more variety to what was inside those chunks to ensure duplicate chunks loaded for a level would not look exactly the same. To achieve this we created Procedural Obstacle Volumes that generate random props and cover objects within each level chunk.
Procedural Obstacle Volumes
Procedural Obstacle Volumes represent a volume of space where randomly selected prefabs such as cover objects are spawned in M.E.R.C. They allow us to add more variety within level chunks, even when duplicate chunks are loaded.
First, we created a component called "ProceduralObstacle" that is added to every prefab that can be loaded through the system. The component tracks the bounding box size of the prefab along with some tags and other settings. Anytime the prefab gets updated in the editor, it is automatically updated in a global manifest ScriptableObject. This manifest is then used as a lookup when we want to load the prefabs in a procedural volume.

Next, we placed Procedural Obstacle Volume game objects inside our level chunks. These volumes have settings that let the us pick the prefabs that are allowed to spawn in them based on their tags and direction facings. For instance, we might want an area to only spawn prefabs that are set for outdoors, are destructible, and that provide cover while facing a specific direction. As the level loads, these volumes are processed and randomly pick matching prefabs to spawn. This is all based on the seed that is generating the level (so it's deterministic and works across the network for COOP games). Then we use a standard bin packing algorithm to position the prefabs into the volume as tight as we can with a buffer around them so that mercenaries can still path around them.

Over time we've added a fair number of additions to this system to make it easier for our level designers. For instance, we can click an editor button to see what prefabs might load in a volume before the game is even running. This is a quick way to test what might get generated in the volume based on its settings.

Now that we’ve gone over generating the level paths, obstacles, light settings, and NavMesh setup, we need to populate it with some enemies!
NPCs and Tempo Curves
When creating each level chunk for M.E.R.C., we strategically place NPC spawn points within each chunk; however, we don't want them all to spawn when the game runs because that would just be mayhem. Instead we determined which spawn points will trigger when a procedural level loads based on a Tempo Curve.
A Tempo Curve is a simple concept we came up with to represent the "beats" of a level's tempo. Using Unity animation curve graphs we can control how easy and hard the level gets as you progress through it. An example is shown below.

When a procedural mission is loading it has a base mission difficulty and we randomly pick a Tempo Curve from a list to use for its tempo. We evaluate the Tempo Curve points relative to each other. This means that wherever points appear on the chart, our code finds the lowest one and considers this zero or "Don't Spawn". It then finds the highest point and consider that "Much Harder". It averages out where to put the other challenge modifiers in equal increments between the lowest and highest points as follows:
Don't Spawn (lowest point)
Much Easier (spawn much easier NPCs)
Easier (spawn easier NPCs)
Baseline (matches the mission difficulty)
Harder (spawn harder NPCs)
Much Harder (highest point)
For example, if the level's main path ends up having 9 chunks, the above Tempo Curve points are mapped out along that path from start to end. The first chunk maps to "Don't Spawn", the 4th point (or 7th chunk) maps to "Much Harder", and the last point (or last chunk) maps to "Don't Spawn". All the other chunks would map to their points on the curve and determine what tempo to use for spawning NPCs in those chunks. The result is a beat for how the level flows in terms of NPC difficulty. The above chart starts slowly and builds up to a big battle before the end on the main path. Almost every chunk in this example will spawn some NPCs, except for the first and last chunks, so there will be a constant NPC presence.
NPCs in M.E.R.C. are spawned using a point system. We have a full spreadsheet of points based on your current squad's level and the difficulty rating of the mission. From this we determine how many points to spend when building NPCs. If the spawn's challenge modifier is set to "Baseline" then it will spawn NPCs that match your squad's level for the mission difficulty selected. If it is set to "Easier" or "Much Easier" it will take away some points to spend when building NPCs. Similarly, "Harder" and "Much Harder" will add extra points to spend. Spawns use these points when determining both how many and what level of NPCs to spawn.
While the main path is populated with NPCs based on a Tempo Curve, we also randomly pick Tempo Curves to manage the flow of every dead end path. So the flow of a level can change depending on what path you take. This mix provides more variety and replayability for our procedural level system.
Summary
M.E.R.C. is a game designed for replayability. As a result, it benefits greatly from having a procedural level generation system.
Starting by building a main path and then layering on subsequent requirements, we've built a robust system that can be tweaked and added to as we move forward and introduce new gameplay mechanics. By using a single seed for all our random calculations we've ensured everything is generated deterministically and can be replicated across the network for COOP play. I’m happy to discuss any of these subjects in more detail, and would love any suggestions and feedback you might have to offer. You can contact me on Twitter at @velvetycouch
M.E.R.C. is in Early Access on Steam right now and we'd appreciate your feedback and support. Please check it out!
Top-down view example of a procedural level loading in M.E.R.C. (click to watch it play):

Read more about:
Featured BlogsYou May Also Like