Trending
Opinion: How will Project 2025 impact game developers?
The Heritage Foundation's manifesto for the possible next administration could do great harm to many, including large portions of the game development community.

Featured Blog | This community-written post highlights the best of what the game industry has to offer. Read more like it on the Game Developer Blogs or learn how to Submit Your Own Blog Post
From successful planning to test execution, the blog gives exclusive insights into QA planning during the project planning phase, as well as building up the optimal QA device matrix in different stages of project for best coverage and successful launch.

Ensuring quality on diverse mobile hardware is a daunting task. In the competitive gaming market, there’s just one chance to get it right. There’s some anxiety to launch and complete QA quickly to get your product onto the market and the appstore properly. Here are some useful tips to help you quickly move ahead to launch.
Successful planning will greatly improve your results. The following steps provide guidance on how to plan your test, allowing for some customisation and fine tuning, depending on the game being tested.
Emulators can be extremely helpful to provide a quick turnaround in the early stages of test. If used properly and efficiently, like within an automation structure, they can also allow for massive amounts of data that can increase your QA efficiency drastically. Planning for them, if you can and if applicable, can be a great boon for your development plan.
However, like any tool or practice, there are limitation to what they can allow you to do or verify. So while they can be great, you also need to complement your plan with other tools and practices. Therefore for best results the testing should be carefully planned between emulators and real devices.
“Real-life” devices will allow you to test directly, as well as verify partial results you are receiving from QA emulation and QA automation. This approach will allow you to verify battery drainage, geolocation, network, inbuilt sensors, screen, interrupts or push notification, multiple installed apps interaction, device memory allocation, user behaviour, and more, which is only possible when you have the phone in your hands.
When it comes to devices, it’s important to understand the device selection process before planning QA. Consideration should be given to the device landscape, which is mainly dependent on 3 parameters.
Hardware: Chipset, CPU, GPU, RAM.
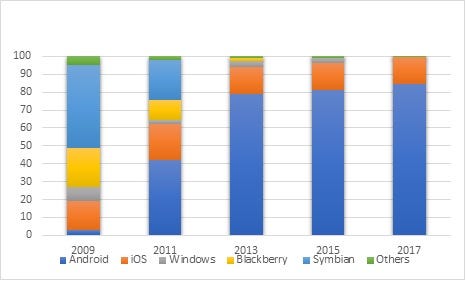
Platform: In recent years, this has been simplified with only 2 major players, i.e. iOS and Android, remaining in the market.
Global Smartphone Market Share- By OS/Platform

Reference: https://www.statista.com
Manufacturer: Selecting devices by manufacturer helps to kill two birds with one stone.
It allows you to cover the most important devices that are currently available in the market.
It helps you cover the most popular range of hardware amongst target user base
Global Ranking of Smartphone Production & Market Share by Vendors, 2017-18 .jpg/?width=700&auto=webp&quality=80&disable=upscale)
While planning device coverage, select a range of OS, screen sizes, manufacturers, CPU, RAM etc. Stay focused and don’t be overwhelmed by the many manufacturers for Android devices. Search and select the most popular in the targeted region.
Be mindful of the full testing scope and avoid focusing solely on the sales numbers. It’s important to include mid and low end devices to cater to the existing user base.
Global Smartphone Market Share in Q1 2018 – By Devices

Source: https://pricebaba.com, May 2018
Don’t randomly test on each and every device that you can borrow or lay your hands on. This will prevent complete coverage across a range of devices.
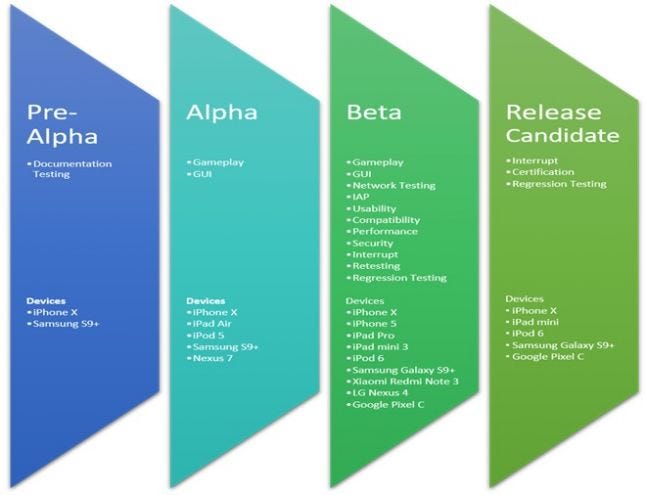
The kind of tests you run on your game/app will largely depend on how feature complete your game is. The entire development cycle can be divided into 3-4 stages of completion.

Pre Alpha/Alpha: This is where the game is in a playable state though not all of the assets/features have been implemented.
The device selection is pretty easy at this stage and you just need to cover the intended platforms i.e. iOS, Android, Blackberry (if desirable) etc.
Select high end devices for gameplay tests e.g. iPhone X/8, Samsung Galaxy 9/8+. This will allow the code to run with maximum efficiency while making it easier to cover major areas of gameplay and find bugs. It’ll also give leeway to optimize your code for the lower end devices.
However as you move towards Beta, it’s important to test graphics and GUI on different screen sizes and resolutions by adding some mid-range devices and tablets (both iOS and Android) to the testbed.
Beta: At the Beta stage, the game is both feature and content complete. A range of tests are required to ensure stable performance such as; Gameplay, Network, In App Purchases, Usability, GUI, compatibility, Performance, Security, Recovery and Interrupts. Correct device selection is critical at this stage.
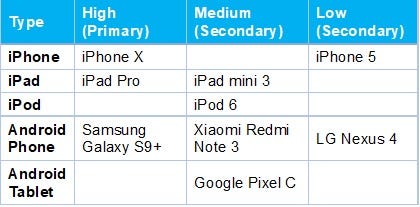
Gameplay, Interrupt, Regression and GUI tests require a wide range of device coverage. The devices can be divided into 2 main categories;
Primary (high end): Gameplay, complete interrupt coverage and regressions.
Secondary (medium and low range): GUI, graphics and resolution, subset of interrupts and sanity. The test duration on the secondary devices will be about one-quarter of primary devices.
Devices by Category and Type

The above matrix covers:
iOS: 6 different chipsets and 5 different screen sizes.
Android: 3 different chipsets, manufacturers and devices.
Attention should be given to the chipsets, to create some variations in your test bed. For example, Samsung S9+ has an Exynos chipset, so when selecting an Android tablet it would make sense to use a different chipset.
Network, IAP, Usability, Security and Recovery testing can take place on just one device per platform. It can be on iPhone X/8 and Samsung S9+/ S8+.
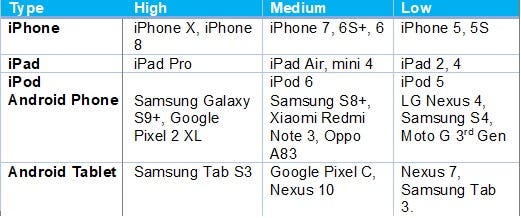
Compatibility should also be conducted, using the maximum number of devices that you can access and your budget (if you’re outsourcing QA) will allow. Especially include maximum low and mid-range devices to cover the market.
Compatibility Device Matrix- Example

Release Candidate: At this stage, your game is now a stable candidate for release. Once Certification, Interrupts, sanity and regression tests are complete, the game can be launched and submitted to Apple and/or Google.
Devices by Category:

QA planning, coverage, target areas and target audience should be completed during project planning phase.
Plan your testing judiciously between emulators and real world devices for maximum efficiency and accuracy.
Rigorously research and choose devices. Examine the sales figures, user base data and build up the right device matrix.
Select different screen sizes and hardware configurations in the test bed.
For your main functionality testing scope, divide the device Matrix into Primary and Secondary devices. Make the latest high end devices as primary. The Medium and Low range devices can be considered secondary devices.
For your main compatibility and performance testing scope, try to cover the maximum number of low and mid-range devices to allow for minimum and recommended specs targeting.
Cater to each development phase with suitable tests and device coverage.
Submit and go live when all major bugs are fixed.
Questions? Do let me know if do things differently.
Read more about:
Featured BlogsYou May Also Like