Trending
Opinion: How will Project 2025 impact game developers?
The Heritage Foundation's manifesto for the possible next administration could do great harm to many, including large portions of the game development community.
An attract mode is perhaps one of the most familiar gaming features for any retro player. I believe this mode was invented in the era of arcade machines, so that a potential player could assess the gameplay without spending a precious coin on the machine.

An attract mode is perhaps one of the most familiar gaming features for any retro player. I believe this mode was invented in the era of arcade machines, so that a potential player could assess the gameplay without spending a precious coin on the machine.
Generally, this demo mode is activated from the main screen of a game, if there is no input from the player. The arcade displays one of the game levels, and controls the protagonist automatically. This demonstrates the fun the player might have, if only the would part with a coin.
We’ve done the same thing here for the console. Pay your attention to the status of the joypad in the lower left corner of the screen. I don’t push anything, everything is done by the console. This is the demo mode, and of course, you could control this character better than NES. So, have you looked at this? Still want to spend a coin? Let's get started then!
There are several methods by which we can make a player move without our participation. The first method is loops and conditions. For example, our goal is to get the player to go to the middle of the screen, wait two seconds, then go back to the left, wait three seconds and jump. To do this, we need to perform a sequence of loops. Something like this:
Too much code, right? However, we did not really do anything, just two moves. And even if we choose to do things this way, we would encounter a bunch of nasty things afterwards. For example, such a “script” is very difficult to edit, and if you need to make a few small changes, this method will drive you crazy, be sure of that.
Let's try to record to a file the desired sequence of clicking your joypad controls, and use this dump to simulate button presses.
Here is the essence of this method: we will disable control for the player, and give our console the ability to read this dump byte by byte to perform the necessary actions.
For this, we will need:
The playable level of your game. You can choose any one you want.
FCEUX emulator.
First, prepare a dump of joypad.
Select a menu item: File -> Movie -> Record Movie.
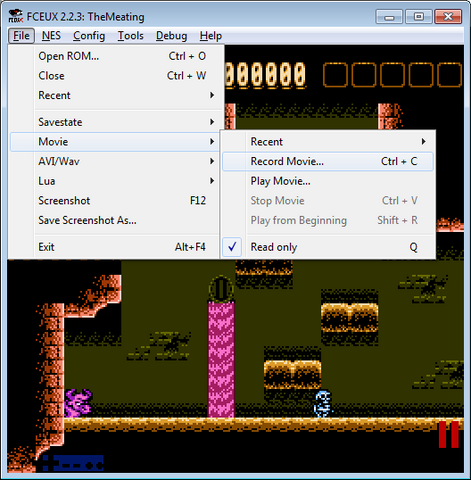
Then specify the filename to make your dump.
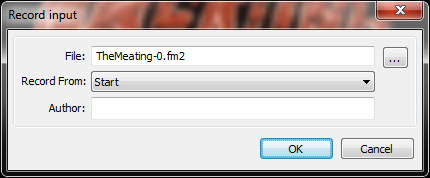
You can choose to record from "Start" (which will reset your game!) or "Now." Click the OK button and emulator will start writing a file. Do not waste time, start playing your game the way you would like to show it in demo mode. To stop recording, use the “Stop Movie” menu item.
I did exactly the same, let's see:
Now find the file you recorded (usually a Movies subfolder in the emulator folder). Open this file with any text editor, and you will see the following:
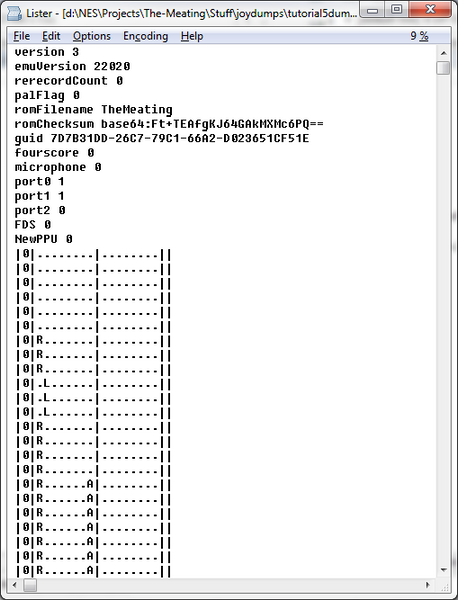
At the beginning of this file there are several lines with service information, then two columns with the states of the first and second joypads. Look at these columns, the first 6 frames I didn’t click anything, then there are three frames with the Right button pressed, three frames with the Left button pressed, and so on. This is exactly what we need.
However, I don't really like how the data is stored. The average dump size for the demo mode is 1000-1500 frames. This will take up a lot of space on the cartridge, so I coded up a small utility that converts this entire dump into the format I need. You can do it yourself, or you can take the sources of my utility for use in Delphi 7.
So, I will store the joypad 1 state to one byte for each frame. I will also pack data on the fly in a format similar to RLE: the first byte will contain the number of frames, then the byte with the joystick state for these frames will follow. Just like this:
frames_count, joy_state, frames_count, joy_state, frames_count, joy_state, .. , #0xff
As you can see, with this simple tool I can convert such a dump into a data array for the C language, which I insert into my source. I also reduced the size of the array from 364 bytes to 19 bytes (nice!). This will help me save space on the cartridge.
However, this array by itself does nothing, so let's try to use it.
First, we need to slightly modify the Neslib library procedures we have been using. There are already subroutines for working with the joypads, but we need a subroutine that will set the joypad states with values from our array.
To do this, add the pad_set procedure to the neslib.s source code:
I also added the label “pad_emu” to the pad_poll function. Right after the @done label.
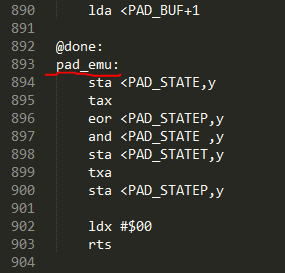
Do not forget to add the name of our function to the “export” section.
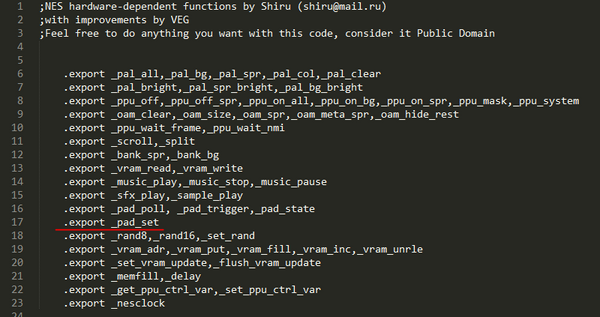
And to neslib.h

There! Now we're getting closer.
Now we should take the values from our array and use them as a parameter for our pad_set procedure. Let's write the code for C.
Now I will call up the playTutorial procedure instead of pad_poll in the game loop, and all the actions that I recorded in the emulator will be performed in the game.
So, now your character can perform any action without your participation. This can be useful not only for the attract mode, but also for tutorial levels.
Record, play, make your game more diverse, and I'm sure there will certainly be retro lovers who will appreciate your efforts!
Read more about:
BlogsYou May Also Like