Trending
Opinion: How will Project 2025 impact game developers?
The Heritage Foundation's manifesto for the possible next administration could do great harm to many, including large portions of the game development community.

Featured Blog | This community-written post highlights the best of what the game industry has to offer. Read more like it on the Game Developer Blogs or learn how to Submit Your Own Blog Post
How to prepare and upload your LibGDX Java game to steam


We got approved for Steam Greenlight in March 2016, which was a little bit of a surprise, since we originally applied in Dec 2014. The game has had 23% 'Yes' votes, and 77% no votes. But there weren't a lot of other 2d games being approved for steam green light at the time, most greenlit games being either ones with anime style graphics, or 3d games with stock assets (Grass simulator was approved very quickly).
So we had just figured the Steam Greenlight community was more fond of either fully complete 2d games, or partially complete 3d games.
(You can see the final store page for the game at: http://store.steampowered.com/app/454260,
or this same post on our blog at: http://ackmi.com/releasing-the-hinterlands-on-steam-libgdx-java-game/)
You'll probably want an icon for your game while running in windows. To add this, in your Main.class for desktop, you'll have to add the icon in your 'LwjglApplicationConfiguration':
LwjglApplicationConfiguration cfg = new LwjglApplicationConfiguration();

cfg.addIcon("resources_pc/icon_32x32_windows.png",FileType.Internal);
(replacing the first string with the path to your icon)
To make your game run windowed, borderless, but look full screen, insert under the above:
System.setProperty("org.lwjgl.opengl.Window.undecorated", "true");
cfg.width = (int) (LwjglApplicationConfiguration.getDesktopDisplayMode().width);
cfg.height = LwjglApplicationConfiguration.getDesktopDisplayMode().height;
I had been exporting out PC builds of the game for people to try out for some time, and LibGDX has a decent article about how to do it using eclipse: https://github.com/libgdx/libgdx/wiki/Deploying-your-application. Basically right click on your PC project, go to export, export as a runnable jar, extract or package libraries into the jar.
You'll now have a runnable jar of your game, but you'll need to copy all of the assets from your project into the same folder to be able to run it. You can start it from the console to see any debugging info (in case you're not sure what asset you're missing) by going to the command line, going to the folder that your .jar file is in, and running it using 'java -jar thenameofyourjar.jar'. You'll have to make sure the have your PATH variable setup in windows to java if it is not already (http://stackoverflow.com/questions/1672281/environment-variables-for-java-installation).
So if everything is working properly, you should be able to double click your jar to run it, or run it from the command line like above (to see any debugging output).
There are two tools I've found for packing your jar as an exe.
* Launch4j http://launch4j.sourceforge.net/
* packr https://github.com/libgdx/packr
Packr sounds like it would be a lot better, is a tool actually made by the LibGDX guys, and recommended through their wiki. It allows you to also package your jar up for Mac and linux. It also offers the option to slim down a copy of the JRE with your game.
But, some of the negatives compared to launch4j:
It doesn't allow you to also have an icon on your exe automatically (and no information on how to do it manually)
It doesn't actually wrap your jar file- it creates a small exe and includes your .jar file
It seems to clear out your destination folder, so if you wanted to copy your assets over manually the first time, it removes them (but has an option to copy over your assets every time)
So I ended going with launch4j (although both generated runnable executables) because of it looking more professional- an exe with an icon. The GUI also gives you feedback if you're missing something, whereas packr does not. After you output with packr, you can get feedback to figure out what went wrong by running your executable from the command like such as:
TheHinterLands.exe -c –console
The first time I submitted to steam using Launch4j, I got a message back saying that it required an extra library (Java- the JRE), and it needed to have an installer packaged with it, or have the library included. Launch4j will automatically redirect someone launching your app to the Java download site, but it doesn't look professional, and an end user might not know what version or the JRE they need (x64, x86, ect).
But both packr and Launch4J allow you to specify the location of a bundled JRE. On the packr site, there are actual instructions on what you need to do, whereas the Launchj site had no information, and the best answer on stack overflow was to just include your jre folder from your program files directory!
So packr actually directs you where to download JRE's you can redistribute with your game, with zip files of the openJDK: https://github.com/alexkasko/openjdk-unofficial-builds.
The page says that project is discontinued, and links to the newer OpenJDK 8 bundles, but only the OpenJDK 7 bundles worked for me.
If you want to support both 32bit and 64 bit operating systems, you can just include the 32bit JRE, and it allows it to run on both systems (the i585= 32bit openjdk-1.7.0-u80-unofficial-windows-i586-image.zip).
Download that, and all you need is the jre folder from the zip that you include with your game.
Now you should have everything to make the game redistributable on Steam.
If you're curious whether the jre folder you included actually works or not, you can manually use it to try to run your jar. Put your jar in the folder with your assets and the jre, and create a new batch file called 'testing.bat'.
Add the following lines:
jre\bin\java.exe -jar TheHinterLands.jar
pause
Save, and double click the bat file to test it. It should use the java file relative to your batch file to try to run your jar, and will pause after closing, so that you can see any errors/ console output for anything that might have gone wrong.
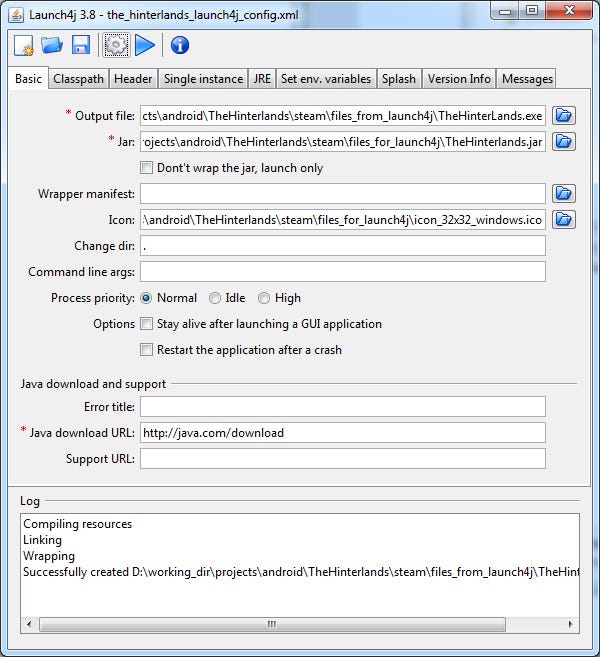
On the first/'basic' tab, you need to fill in 'Output file', 'Jar', and you can add your 'icon'.
After that you just need to fill in the 'JRE' tab with the 'Bundled JRE path' as just 'jre' (folder relative to your exe), min JRE version 1.7.0, max I just did as 9.0.0 (so that it can work for some time).
To convert your .jar into the exe, you have to click the gear shaped icon, not the play, highlighted button. Once you do that, you should have your exe in the folder you specified (after it prompts you to save your settings)
If all your assets are in there, you should be able to just run your exe, and start up your game.

You'll find the same write up in the steamworks developer area, but I had a little bit of trouble getting it working. (Follow that documentation for getting your builds/ depots ready on the developer console end)
The videos from the developer area were helpful, but didn't all work for me, and seemed outdated with the interface (which this might be by the time you read it, but as of right now, builds/depots are under app admin-> the steampipe tab)
First you'll want to download the sdk, and unzip it to a location you'll be uploading to Steam from.
Then browse to sdk/tools/ContentBuilder/content and make a new folder named 'windows_content', and copy all of your game files you plan to upload to steam there (your exe, your assets, everything needed to run the game). You can run it again from here if you want to check to make sure everything still runs fine.
Then you'll have to update the included sample scripts under: 'sdk/tools/ContentBuilder/scripts', an app build and depot build.
Make sure to grab what you app id and depot id for your game are from the Steamworks interface (2 different 6 character numbers, my depot number was one more than my app number. Example: app_id=900120, depot number = 900121). The SteamWorks tutorials recommend renaming both files with your app and depot numbers instead of the default ones values, so you might as well do that as well.
Open up the app_build file in a text editor, change out your app_id, and your depots values and save. Example:
"appbuild"
{


"appid" "900120"

"desc" "Your build description here" // description for this build

"buildoutput" "..\output\" // build output folder for .log, .csm & .csd files, relative to location of this file

"contentroot" "..\content\" // root content folder, relative to location of this file

"setlive" "" // branch to set live after successful build, non if empty

"preview" "0" // to enable preview builds

"local" "" // set to flie path of local content server

"depots"
{
"900121" "depot_build_900121.vdf"
}
}
Save and open up your depot file. Change your 'DepotID', comment out 'ContentRoot', change 'LocalPath' to:
"LocalPath" ".\windows_content\*" (don't forget the star, or it doesn't grab anything).
So an example would be:
"DepotBuildConfig"
{
	// Set your assigned depot ID here
	"DepotID" "900121"

	// Set a root for all content.
	// All relative paths specified below (LocalPath in FileMapping entries, and FileExclusion paths)
	// will be resolved relative to this root.
	// If you don't define ContentRoot, then it will be assumed to be
	// the location of this script file, which probably isn't what you want
	//"ContentRoot"	"..\thiswilloverridetheoneinappsettings\"


	// include all files recursivley
  "FileMapping"
  {
  	// This can be a full path, or a path relative to ContentRoot
    "LocalPath" ".\windows_content\*"

    // This is a path relative to the install folder of your game
    "DepotPath" "."

    // If LocalPath contains wildcards, setting this means that all
    // matching files within subdirectories of LocalPath will also
    // be included.
    "recursive" "1"
  }

	// but exclude all symbol files
	// This can be a full path, or a path relative to ContentRoot
  "FileExclusion" "*.pdb"
}
Save, and you can finally work on the final step. Edit in your text editor 'run_build.bat' in the folder 'sdk/tools/ContentBuilder/'. Change out the login with your Steam name and password, and the app_build with whatever yours is named. Example:
builder\steamcmd.exe +login steam_account_name password +run_app_build_http ..\scripts\app_build_900121.vdf +quit
Finally click on the bat file to run it, and it should upload the content for your game to steam! It takes quite awhile (maybe 10 minutes for about 100mbs- might setup stuff on their end for the first run).
Once it finishes, you should be able to see your content in steamworks under App->App Admin->SteamPipe tab->builds. Click on the drop down next to your most recent depot, and click default to make it the default build. You can also download your files (to make sure everything was uploaded correctly) by clicking on the highlighted depot number next to the drop down, and downloading your files as a zip.
If everything works, all you need to do is finish the checklist on your app page (by clicking on your app, and looking on the right hand side for the checklists 'Your Store Presence' and 'Your Game Build'.
And you're ready to release!
Read more about:
Featured BlogsYou May Also Like