Trending
Opinion: How will Project 2025 impact game developers?
The Heritage Foundation's manifesto for the possible next administration could do great harm to many, including large portions of the game development community.
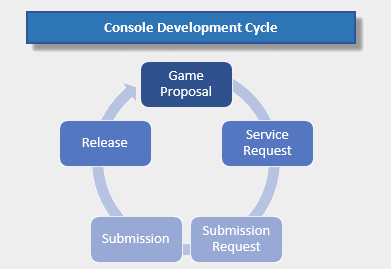
Ever wondered what major steps it takes to develop and publish a game on consoles in today's market? Here I've outlined five phases that you need to know about prior to starting development on your first console game.

Hey everyone,
Ever thought about making a video game for a video game console like PlayStation 4 or Xbox One? This article will provide a brief breakdown to the five major steps you’ll need to take before, during, and up to your game’s release.

1: Game Proposal
First and foremost, before you get anything started you’ll need to reach out to the appropriate Hardware Manufacturer and get some hardware. In order to do this you’ll need to be registered on their respective Developer portals (Sony and Microsoft sign-up included here*). Once your company is registered with accounts you’ll be able to navigate their proprietary web portals with a bunch of handy information for developers like you. Most importantly however, these websites give you access to three things you’ll definitely need: Hardware, Software, and a Proposal document.
Regarding hardware, make sure you place an order for some Development Kits in order to have something to test your game on—if you want to develop for Microsoft, just download their handy app off the Windows Live store and convert your retail kit at home into a DevKit!
For software, make sure you get ahold of their respective Software Development Kits in order to handle your code (the accounts you made earlier will give you access). Make sure to read through the extensive list of APIs/Tools they have and stop by the forums (Sony has great Unity support if that’s your jam).
Finally, your Game Proposal is a roughly ten page document that tells your HM (Hardware Manufacturer) what you plan on making for their platform. It’ll cover things ranging from your game’s title and feature list all the way up to your pricing plan and intended release schedule. Once you’ve got that, you send it off to your point of contact and wait for an answer.
While it isn't required, consider having a sample you can present to your HM as a proof of concept!
Got approved? Great! You’re ready to move onto Phase Two, which is…
2: Service Requests
While normally I’d talk about Service Requests and Development as two distinct phases, I’ll work under the assumption that if you’re reading this with intent you have some development skills ready to go. Given this, we’ll mostly talk about service requests and how they relate to your development process.
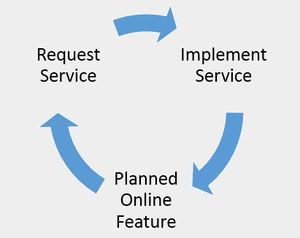
Requesting services is fairly simple, but knowing what you’ll need is often much harder to figure out—especially when you’re shifting design decisions throughout the development cycle. Any time you want an online feature in your game, odds are that your HM has written code and API’s for the system to handle these things for you. If that’s the case, you’ll need to request any and all services which require some server space—Online Matchmaking? Sure! Leaderboards? Definitely. While you’re able to program your own systems for matchmaking, lobby hosting, and more—I’d highly recommend as a first-timer that you take a look at all the options each HM has to offer you. Odds are that if you want it, they’ve built it efficiently and can fit it in with your title seamlessly.
 Make sure you also take the time to become acquainted with services that you will definitely have to call—things like trophies and achievements will be required if your game is going to be purchased by consumers. Speaking of which, make sure you read up on the requirement documentation each platform has! Most Manufacturers have well over 100 requirements, of which most will likely apply to your title.
Once you’ve got a game ready to go and you think it’s in a good enough shape to be released to the public, that’s when you’ll get to the real challenges.
3: Requesting a Submission
Your title is ready, you’ve completed your feature list, ironed out any major bugs, and tackled all of the requirements imposed on you by the Hardware Manufacturer; now what? Next, you request that the title be submitted to the Hardware Manufacturer’s QA team for approval. While I won’t delve into too many details, know that there are primarily two main services: Pre-Submission and Submission. To get testing on your title, you’ll submit a request form online with a requested date (try to book 2-4 weeks in advance), then upload your build and paperwork to go with it. Once all that’s done, the game will be submitted!
4: Submission Testing
Three Layers
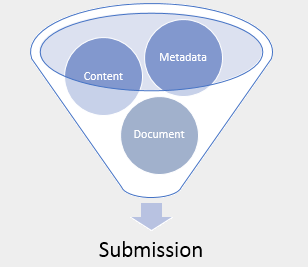
When submitting, there are three distinct sections that need to be managed simultaneously.

First, you’ll most obviously need a build with content that meets all the Hardware Manufacturer’s requirements uploaded and ready for test.
Second, you’ll want to make sure you fill out all the corresponding documentation—this is very similar to the proposal I talked about in phase 1, but it’s essential that the information is correct, as anything represented incorrectly could lead to you receiving a failure even before testing has begun!
Third, you’ll need to work with a Hardware Manufacturer on your title's metadata info—things like pricing, art, text, and release date. This last part is essential, but you can’t really fail since all HM's are pretty good about handholding you through this setup
With these three layers in mind, let��’s continue to talk about the different kinds of submission available to you.
Final Submission
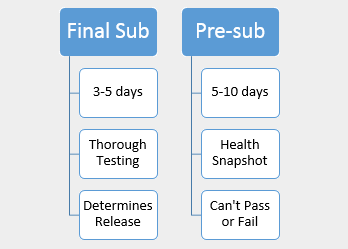
Before I talk about Pre-submission, let’s talk about what an actual submission is like. This is a process where you send your game to Sony or Microsoft for approval and they have a team test your game against every applicable requirement. This usually takes between 3-5 business days, after which you’ll get a report with a list of issues. If any of these issues are qualified as bugs which have to be fixed before released you’ll be considered to have failed submission. If you fail submission you’ll have to re-book a second submission with all the requested fixes implemented and hope your build fares better the second time around.
However, the catch is that while your first submission is free, your second submission is going to cost you oodles of money (think ten to fifteen thousand), and then it continues to go up from there with each successive failure. Why does this cost exist? Developers figured out at some point a long time ago that rather than testing their game, they could use this service as a form of free testing by resubmitting time and again risk-free.
Pre-submission
So what is pre-submission? While the times and details vary a bit between each manufacturer, pre-submission is about half the cost of what your second submission would be (so about 5000 USD)and will do a couple of things for you:
 First, it’ll let you know how close you are to meeting the HM’s requirements—violating just one of these will net you a ‘Failed’ result and force you into resubmission with a hefty fee. This is a really useful health snapshot that’ll catch all the major issues your build might have.
Second, it’ll save you money in that you’ll be able to fix the broad issues and give you a roadmap of areas you have which are weaker and need more testing/work.
Finally, it’ll give you an opportunity to familiarize with the process of actually submitting your game before the real thing.
Want to find out more about how to handle submission? I’ll be at QA & Loc in Berlin on June 29th with a talk on preparing for your first submission with a lot more useful info!
5: Production / Post-Sub
Cool! You passed submission, so what now? Well, a lifetime of sales, patches, and DLC will hopefully follow-up your title’s successful launch. Once you start making money, you can use that revenue to start up the whole cycle again. Keep in mind that every patch and DLC will also need to go through submission (and you should likely skip the pre-submission to save the money). While both HM’s have fast track processes in place which expedite/ease the submission process, they’re all currently operated on the merit system, so a single mistake could cost you and your publisher access to the fast track process forever. This means you’ll want to take special care to make sure your patches and DLC meet all the requirements set out for them!
Oh, and if you’re really smart, you’ll keep all of your submission results for later! They’ll help you build up a list of previous failures to avoid as well as give you a platform to discuss issues for later submissions on the same title.
Questions? Comments? Nods of approval? Feel free to let me know!
*Please note that I am not affiliated with Sony or Microsoft
Read more about:
BlogsYou May Also Like